So, you want to create a custom audio player? Only to find out that there is literally no way to style the native HTML audio (at the time of writing). What’s worst, it does not even support a playlist. Well, it’s not really easy. But let Master Coffee walk you through a “rather capable custom audio player with a playlist”, let’s go.
CODE DOWNLOAD
I have released this under the MIT license, feel free to use it in your own project – Personal or commercial. Some form of credits will be nice though. 🙂
VIDEO TUTORIAL
PART 1) THE HTML
<div id="player">
  <!-- (PART A) CURRENT SONG IMAGE -->
  <img id="playImg" src="songs/loading.webp">

  <!-- (PART B) CONTROLS -->
  <div id="playControls">
    <!-- (B1) SONG NAME -->
    <div id="playName">Select A Song</div>

    <!-- (B2) SONG TIME -->
    <input id="playTimeR" type="range" value="0" min="0" disabled>
    <div id="playTimeD">
      <div id="playTimeN">0:00</div>
      <div id="playTimeT">0:00</div>
    </div>

    <!-- (B3) LAST, PLAY/PAUSE, NEXT, VOLUME -->
    <div id="playButtons">
      <i id="playLast" class="icon-previous2"></i>
      <i id="playTog" class="icon-pause2"></i>
      <i id="playNext" class="icon-next2"></i>
      <i id="playVolI" class="icon-volume-high"></i>
      <input id="playVolR" type="range" min="0" max="1" step="0.1" value="1" disabled>
    </div>
  </div>

  <!-- (PART C) PLAYLIST -->
  <div id="playList">
    <div data-src="guitar.mp3" data-img="guitar.webp">Guitar</div>
    <div data-src="piano.mp3" data-img="piano.webp">Piano</div>
    <div data-src="trombone.mp3" data-img="trombone.webp">Trombone</div>
  </div>
</div>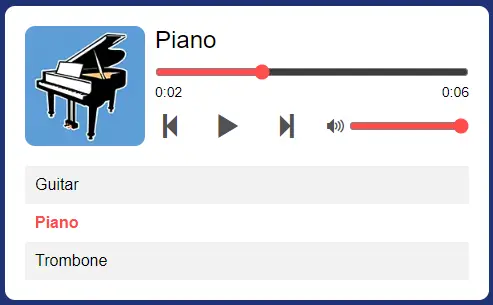
There are quite a lot of components to the audio player. But look at the screenshot above and you will be able to figure out which is which.
<img id="playImg">The current song image/cover.- Audio player controls.
- (B1)
<div id="playName">the current song name. - (B2)
<input id="playTimeR">time select slider,<div id="playTimeN">current time,<div id="playTimeT">total time. - (B3)
<i id="playLast">last song,<i id="playTog">play/pause,<i id="playNext">next song. - (B3)
<i id="playVolI">volume icon/mute toggle,<input id="playVolR">volume slider.
- (B1)
<div id="playList">The playlist. Each song in the format of<div data-src="SONG.FILE" data-img="IMAGE.FILE">NAME</div>
P.S. Keep all your songs and images in the songs folder.
PART 2) THE JAVASCRIPT – PROPERTIES & HELPER
var player = {
  // (PART A) PROPERTIES
  // (A1) HTML ELEMENTS
  hImg : null, // song image
  hName : null, // song name
  hTimeR : null, // song time slider
  hTimeN : null, // song current time
  hTimeT : null, // song time
  hLast : null, // last song
  hTog : null, // toggle play/pause
  hNext : null, // next song
  hVolI : null, // volume icon/toggle
  hVolR : null, // volume slider

  // (A2) AUDIO & PLAYLIST
  pAud : null, // audio player
  pList : null, // playlist
  pSeek : false, // user seeking time slider
  pNow : 0, // currently playing

  // (PART B) HELPER - FORMAT "NICE TIME"
  nicetime : secs => {
    let m = Math.floor(secs/60),
    s = secs - (m * 60);
    if (s<10) { s = "0" + s; }
    return `${m}:${s}`;
  },
  ...
};
The Javascript can be intimidating, let’s break it down section-by-section.
- All the mechanics are contained within the
var player = {}object. - (A1) Seemingly a lot of properties, but these are all just references to the HTML buttons and sections.
- (A2) The audio player itself, the playlist, current song, and “currently seeking time” flag – Will explain these later.
- (B) A helper function to turn seconds into a “nice format” of
MM:SS.
PART 3) THE JAVASCRIPT – INITIALIZE
// (PART C) INITIALIZE
init : () => {
  // (C1) GET HTML ELEMENTS
  player.hImg = document.getElementById("playImg");
  player.hName = document.getElementById("playName");
  player.hTimeR = document.getElementById("playTimeR");
  player.hTimeN = document.getElementById("playTimeN");
  player.hTimeT = document.getElementById("playTimeT");
  player.hLast = document.getElementById("playLast");
  player.hNext = document.getElementById("playNext");
  player.hTog = document.getElementById("playTog");
  player.hVolI = document.getElementById("playVolI");
  player.hVolR = document.getElementById("playVolR");

  // (C2) AUDIO OBJECT & PLAYLIST
  player.pAud = new Audio();
  player.pList = document.querySelectorAll("#playList div");

  // (C3) AUTO SWITCH PLAY/PAUSE ICON
  let pp = () => player.hTog.className = player.pAud.paused ? "icon-pause2" : "icon-play3" ;
  player.pAud.onplay = pp;
  player.pAud.onpause = pp;

  // (C4) AUTO PLAY NEXT SONG
  player.pAud.onended = () => player.load(true);

  // (C5) AUTO UPDATE CURRENT TIME
  player.pAud.ontimeupdate = () => {
    if (!player.pSeek) { player.hTimeR.value = Math.floor(player.pAud.currentTime); }
    player.hTimeN.innerHTML = player.nicetime(Math.floor(player.pAud.currentTime));
  };

  // (C6) TIME SLIDER
  player.hTimeR.oninput = () => player.pSeek = true;
  player.hTimeR.onchange = () => {
    player.pAud.currentTime = player.hTimeR.value;
    player.pSeek = false;
    if (player.pAud.paused) { player.pAud.play(); }
  }

  // (C7) CLICK TO PLAY SONG
  for (let [i, song] of Object.entries(player.pList)) {
    song.onclick = () => player.load(i);
  }

  // (C8) INIT - PRELOAD FIRST SONG
  player.load(0, true);
},
...
// (PART E) START
window.addEventListener("load", player.init);
On window load, we call player.init(). Pretty much get the HTML elements and deal with the “basic player mechanics”.
- (C1) Get the HTML buttons, controls, sections.
- (C2) Create a
new Audio()object, and get the playlist. - (C3) Automatically switch between the play and pause icons when the song is playing/paused.
- (C4) Automatically play the next song when the current song has ended.
- (C5) Update the current time and time slider as the song plays.
- (C6) Update the song’s current time as the user changes the time slider. Take note of the
player.pSeekflag here. As the song plays, (C5) will continue to update. This flag is to “temporarily disable” (C5), so the time slider does not “suddenly move” as the user changes the slider. - (C7) Loop through the playlist, click on a song to play it.
- (C8) Preload the first song in the playlist.
PART 4) THE JAVASCRIPT – LOAD SONG
// (PART D) LOAD SELECTED SONG
load : (song, preload) => {
  // (D1) STOP PLAYING CURRENT SONG
  if (!player.pAud.paused) { player.pAud.pause(); }

  // (D2) LOCK INTERFACE
  player.hImg.src = "songs/loading.webp";
  player.hName.innerHTML = "Loading";
  player.hTimeR.disabled = true;
  player.pSeek = false;
  player.hLast.onclick = "";
  player.hNext.onclick = "";
  player.hTog.onclick = "";
  player.hVolI.onclick = "";
  player.hVolR.disabled = true;

  // (D3) NEXT SONG TO PLAY
  if (song === true) { player.pNow++; }
  else if (song === false) { player.pNow--; }
  else { player.pNow = song; }
  if (player.pNow >= player.pList.length) { player.pNow = 0; }
  if (player.pNow < 0) { player.pNow = player.pList.length - 1; }

  // (D4) SET SELECTED SONG
  for (let song of player.pList) { song.classList.remove("current"); }
  let selected = player.pList[player.pNow];
  selected.classList.add("current");

  // (D5) LOAD SELECTED SONG
  player.pAud.src = "songs/" + selected.dataset.src;
  player.pAud.oncanplaythrough = () => {
    // (D5-1) SET SONG IMAGE & NAME
    player.hImg.src = "songs/" + selected.dataset.img;
    player.hName.innerHTML = selected.innerHTML;

    // (D5-2) SET SONG TIME
    player.hTimeN.innerHTML = "0:00";
    player.hTimeT.innerHTML = player.nicetime(Math.floor(player.pAud.duration));
    player.hTimeR.value = 0;
    player.hTimeR.max = Math.floor(player.pAud.duration);

    // (D5-3) ENABLE CONTROLS
    player.hTimeR.disabled = false;
    player.hVolR.disabled = false;
    player.hLast.onclick = () => player.load(false);
    player.hNext.onclick = () => player.load(true);
    player.hTog.onclick = () => {
      if (player.pAud.paused) { player.pAud.play(); }
      else { player.pAud.pause(); }
    };
    player.hVolI.onclick = () => {
      player.pAud.volume = player.pAud.volume==0 ? 1 : 0 ;
      player.hVolR.value = player.pAud.volume;
      player.hVolI.className = player.pAud.volume==0 ? "icon-volume-mute2" : "icon-volume-high" ;
    };
    player.hVolR.onchange = () => {
      player.pAud.volume = player.hVolR.value;
      player.hVolI.className = player.pAud.volume==0 ? "icon-volume-mute2" : "icon-volume-high" ;
    };

    // (D5-4) START PLAYING SONG
    if (!preload) { player.pAud.play(); }
  };
}
Lastly, player.load() is called “whenever a song is being played” – Preload from init, click on a playlist song, next song, last song.
- (D1) Pause the current song if the player is playing.
- (D2) Lock the controls while the next song loads.
- (D3) “Calculate” the next song to play, remember the
player.pNow“current song flag”? Increment by 1 if it is “next song”, decrement by 1 if it is “last song”, or set the exact song number in the playlist. - (D4) Update the HTML, set the current song.
- (D5) Load the selected song.
- (D5-1) On load, set the song image and name.
- (D5-2) Update the song time.
- (D5-3) Enable the controls.
- (D5-4) Play it.
THE END – MULTIPLE PLAYERS ON THE SAME PAGE?!
That’s all for this tutorial and sharing. For those who are thinking of “adding multiple players to a single page” – Yes, it is possible with some modifications. But things will get very messy with multiple instances, and you need to check and only allow one player to play at a time.
So yes, Master Coffee will recommend you to think in a different manner instead. There is only one audio player, but multiple playlists. The user can choose which playlist, or even add/remove songs by themselves.