Once upon a time, a student downloaded an “HTML tabs example” and spent the entire day trying to understand it. Well, the problem with “some other masters” is that they overcomplicate things. Let Master Coffee walk you through 3 simple ways to create HTML tabs, including one without Javascript… Plus, why it is not the best solution. Let’s go!
CODE DOWNLOAD
I have released this under the MIT license, feel free to use it in your own project – Personal or commercial. Some form of credits will be nice though. 🙂
VIDEO TUTORIAL
1) TABS WITHOUT JAVASCRIPT
1A) DEMO
1B) THE HTML
<div id="demoA" class="tabs">
  <!-- (PART A) RADIO BUTTON -->
  <input id="rOne" type="radio" name="tabs" checked>
  <input id="rTwo" type="radio" name="tabs">
  <input id="rThree" type="radio" name="tabs">

  <!-- (PART B) NAVIGATION -->
  <label id="nOne" for="rOne" class="tNav">Tab One</label>
  <label id="nTwo" for="rTwo" class="tNav">Tab Two</label>
  <label id="nThree" for="rThree" class="tNav">Tab Three</label>

  <!-- (PART C) SECTIONS -->
  <div id="sOne" class="tSec">This is tab one.</div>
  <div id="sTwo" class="tSec">This is tab two.</div>
  <div id="sThree" class="tSec">This is tab three.</div>
</div>
It is possible to create tabs without Javascript. First, create a <div id="demoA" class="tabs"> wrapper, then:
- Start by creating a group of radio buttons.
- Then, attach labels for the radio buttons.
- Lastly, add the respective tab sections.
1C) THE CSS
/* (PART A) TABS WRAPPER */
.tabs {
  display: flex; flex-wrap: wrap;
  max-width: 500px;
}
.tabs input[type=radio] { display: none; }

/* (PART B) LABELS */
.tNav {
  flex-grow: 1;
  text-align: center;
  padding: 10px; cursor: pointer;
  background: #f7f7f7;
}
#rOne:checked ~ #nOne, #rTwo:checked ~ #nTwo, #rThree:checked ~ #nThree {
  font-weight: 700;
  color: #fff;
  background: #4358c1;
}

/* (PART C) SECTIONS */
.tSec {
  width: 100%; padding: 30px 20px;
  background: #fff;
  display: none;
}
#rOne:checked ~ #sOne, #rTwo:checked ~ #sTwo, #rThree:checked ~ #sThree {
  display: block;
}
The magic happens in the CSS, there are only 2 important pieces:
- (A) Hide the radio buttons, it will still work when we click on the labels.
- (C) Hide all the sections by default. Only show the respective section that has been checked.
The rest are pretty much layout and cosmetics.
1D) ADDING MORE TABS
To add more tabs:
- In the HTML, add another set of:
<input id="RADIO" type="radio" name="tabs"><label id="LABEL" for="RADIO" class="tNav"><div id="SECTION" class="tSec">
- In part B of the CSS, add another
#RADIO:checked ~ #LABEL. - In part C of the CSS, add another
#RADIO:checked ~ #SECTION.
Yep, it’s not so convenient. Let’s go through a Javascript version next, which is way more easier.
2) TABS WITH JAVASCRIPT
2A) DEMO
2B) THE HTML
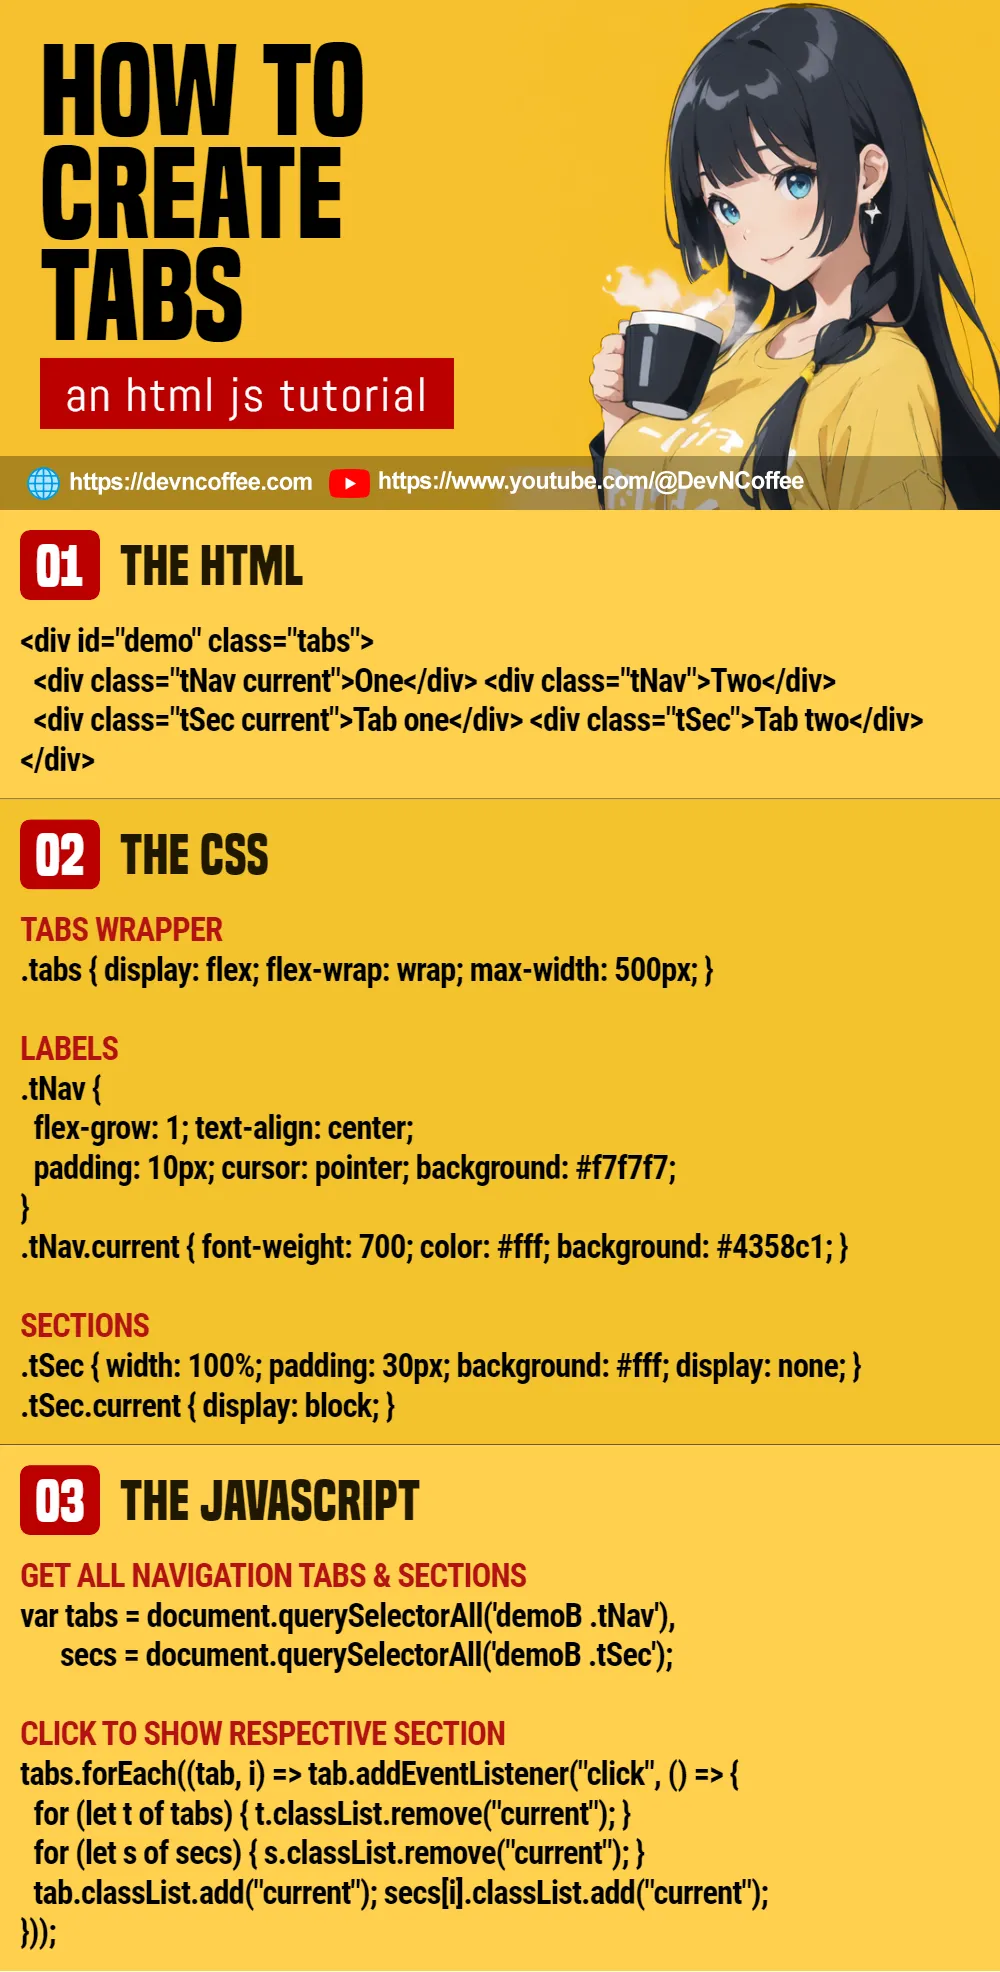
<div id="demoB" class="tabs">
  <!-- (PART A) NAVIGATION -->
  <div class="tNav current">Tab One</div>
  <div class="tNav">Tab Two</div>
  <div class="tNav">Tab Three</div>

  <!-- (PART B) SECTIONS -->
  <div class="tSec current">This is tab one.</div>
  <div class="tSec">This is tab two.</div>
  <div class="tSec">This is tab three.</div>
</div>
No more funky radio buttons. Just add the navigation tabs and sections.
2C) THE CSS
/* (PART A) TABS WRAPPER */
.tabs {
  display: flex; flex-wrap: wrap;
  max-width: 500px;
}

/* (PART B) LABELS */
.tNav {
  flex-grow: 1;
  text-align: center;
  padding: 10px; cursor: pointer;
  background: #f7f7f7;
}
.tNav.current {
  font-weight: 700;
  color: #fff;
  background: #4358c1;
}

/* (PART C) SECTIONS */
.tSec {
  width: 100%; padding: 30px 20px;
  background: #fff;
  display: none;
}
.tSec.current { display: block; }
A slightly different variation, but we only show the selected section by attaching a current CSS class to it.
2C) THE JAVASCRIPT
// (PART A) GET ALL NAVIGATION TABS & SECTIONS
var tabs = document.querySelectorAll("#demoB .tNav"),
    secs = document.querySelectorAll("#demoB .tSec");

// (PART B) CLICK TO SHOW RESPECTIVE SECTION
tabs.forEach((tab, i) => {
  tab.addEventListener("click", () => {
    // (B1) REMOVE CURRENT
    for (let t of tabs) { t.classList.remove("current"); }
    for (let s of secs) { s.classList.remove("current"); }

    // (B2) SET CURRENT
    tab.classList.add("current");
    secs[i].classList.add("current");
  });
});- On page load, get all the tabs and sections.
- When the user clicks on a tab, set a
currentCSS class on the selected tab and section. The end.
3) AJAX TABS
3A) THE HTML
<div id="demoC" class="tabs">
  <div class="tNav" data-src="3-one.html">Tab One</div>
  <div class="tNav" data-src="3-two.html">Tab Two</div>
  <div class="tNav" data-src="3-three.html">Tab Three</div>
</div>This is tab one.This is tab two.This is tab three.This final example is a little on the advanced side, use this if you want to create a one-page app or something similar.
- The HTML only contains the navigation tabs, take note of the
data-src="URL". - The sections will be loaded via AJAX.
P.S. Will skip the CSS, it is the same as the previous example.
3C) THE JAVASCRIPT
// (PART A) GET CONTAINER & TABS
let container = document.getElementById("demoC"),
    tabs = container.querySelectorAll(".tNav");

// (PART B) LOAD SELECTED SECTION
function tLoad (tab) {
  if (tab.section) { tab.section.classList.add("current"); }
  else {
    fetch(tab.dataset.src)
    .then(res => res.text())
    .then(txt => {
      let sec = document.createElement("div");
      sec.innerHTML = txt;
      sec.className = "tSec current";
      container.appendChild(sec);
      tab.section = sec;
    });
  }
}

// (PART C) CLICK TO SHOW RESPECTIVE SECTION
tabs.forEach((tab, i) => {
  tab.addEventListener("click", () => {
    // (C1) CLEAR CURRENT
    for (let tab of tabs) {
      tab.classList.remove("current");
      if (tab.section) { tab.section.classList.remove("current"); }
    }

    // (C2) SET CURRENT
    tab.classList.add("current");

    // (C3) SHOW SECTION
    tLoad(tab);
  });
});

// (PART D) LOAD FIRST TAB
tLoad(tabs[0]);
tabs[0].classList.add("current");- On page load, get the container and tabs.
- A helper function.
- On the “first click”, this will load the
data-srcvia AJAX and insert it into the container. - On the “following clicks”, it will simply show the loaded section.
- In either way, it is pretty much “set a
currentCSS class” on the selected tab/section.
- On the “first click”, this will load the
- Click to show the respective section.
- Initialize, load the first tab.
THE END
That’s all for this short tutorial and sharing. Before we end, Master Coffee will share this warning again – No Javascript does not necessarily mean easier. Sometimes, it just adds “more restrictions” and “harder to maintain”. So, if you are not allergic to Javascript, it’s time to get past that “it’s difficult” mindset.
CHEAT SHEET