Once upon a time, a student was tasked to display a CSV file in an HTML table. Her immediate reaction is “CSV files can only be opened in spreadsheet software”. Well, she’s wrong. We can read CSV files in modern Javascript and draw them in a table – Let’s go through some simple examples.
CODE DOWNLOAD
I have released this under the MIT license, feel free to use it in your own project – Personal or commercial. Some form of credits will be nice though. 🙂
VIDEO TUTORIAL
DEMO – DISPLAY CSV FILE IN HTML TABLE
Go ahead, pick a CSV file and it will be drawn in the table above. Take note, no file upload will happen. The CSV file will be read and drawn entirely on your device.
DUMMY CSV FILE
Mandarin Chinese,941,Sino-Tibetan,Sinitic
Spanish,486,Indo-European,Romance
English,380,Indo-European,Germanic
Hindi,345,Indo-European,Indo-Aryan
Bengali,237,Indo-European,Indo-Aryan
For this tutorial, we will use a simple list of the top 5 common languages in the world – Adapted from Wikipedia.
- For beginners – CSV stands for Comma Separated Values, or “plain text with formatting” just like HTML.
- Columns are separated with commas –
COLUMN,COLUMN,COLUMN, ... - Rows are separated with line breaks.
EXAMPLE 1) FETCH CSV FILE FROM SERVER
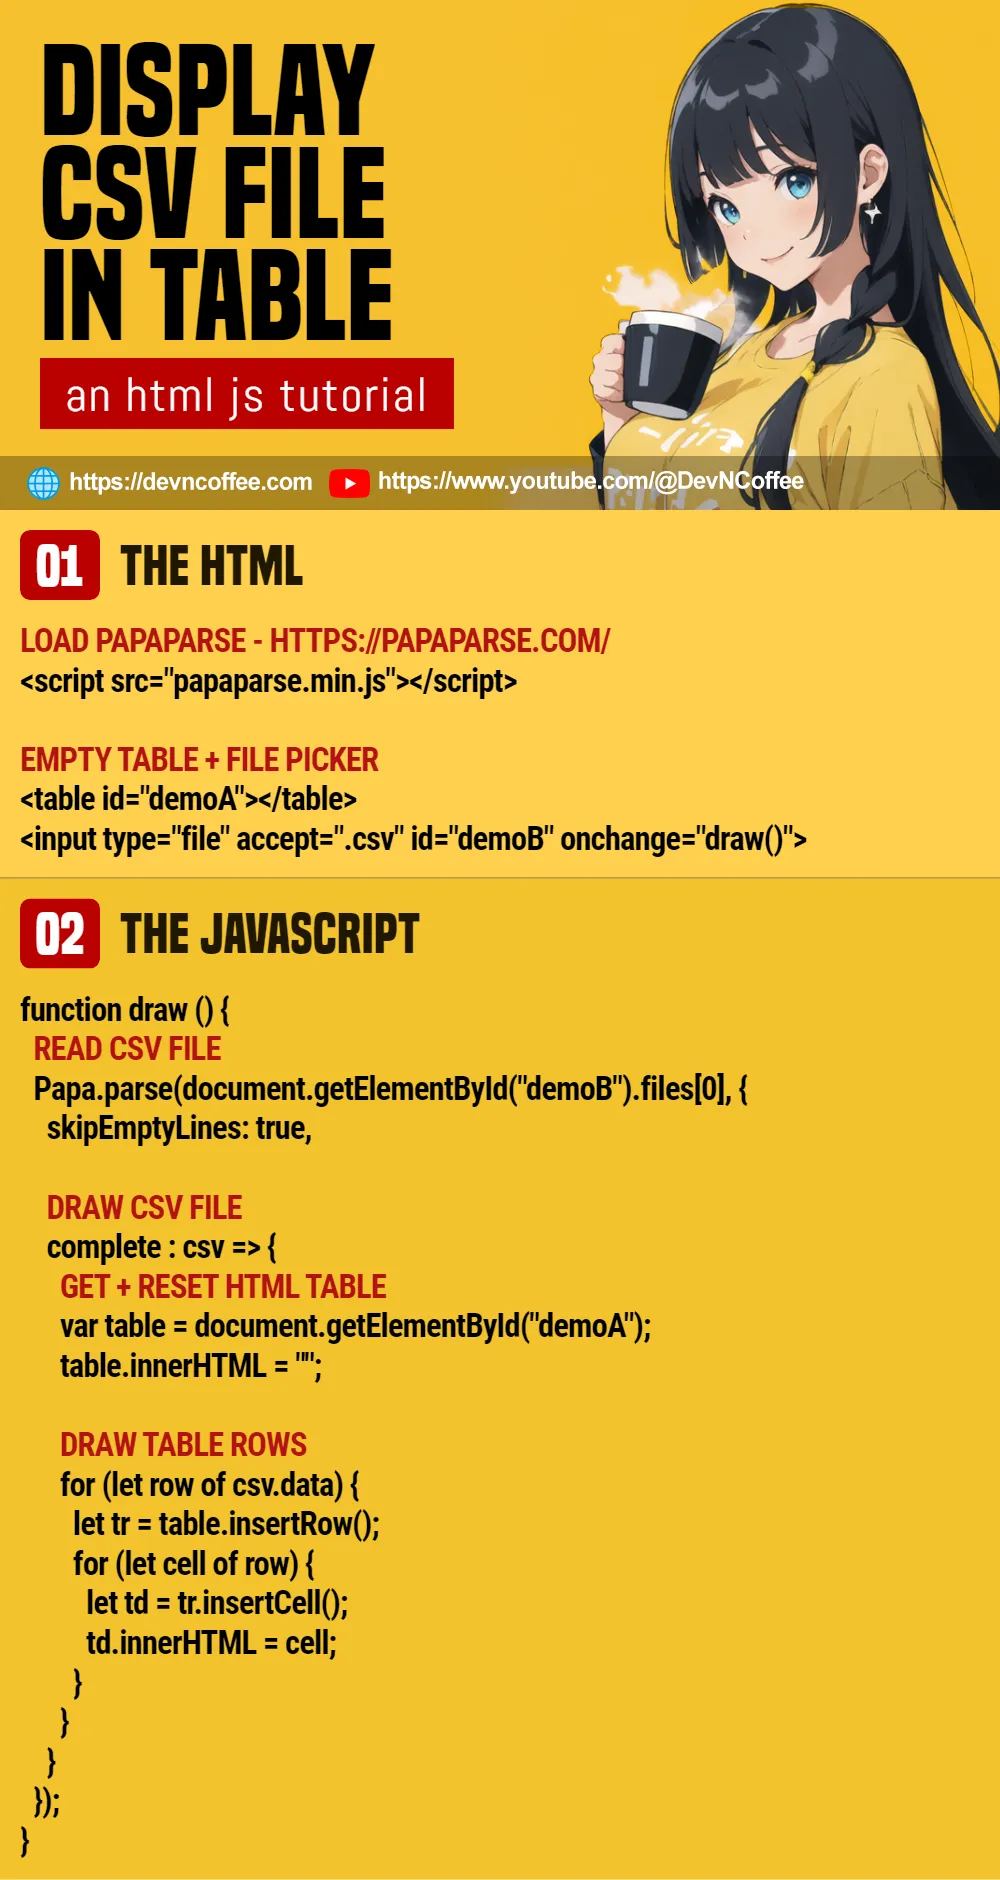
1A) THE HTML
<!-- (PART A) LOAD CSV LIBRARY -->
<script src="papaparse.min.js"></script>

<!-- (PART B) DEMO TABLE & BUTTON -->
<table id="demoA" class="demo"></table>
<input type="button" value="Load CSV" onclick="demoA()">- To parse the CSV file into a Javascript array/object, we will use a library called PapaParse.
- The CSV file will be displayed in
<table id="demoA">.
1B) THE JAVASCRIPT
function demoA () {
  // (PART A) FETCH CSV FROM SERVER
  Papa.parse("0-language.csv", {
    download: true,
    skipEmptyLines: true,

    // (PART B) DRAW CSV FILE
    complete : csv => {
      // (B1) GET + RESET HTML TABLE
      var table = document.getElementById("demoA");
      table.innerHTML = "";

      // (B2) DRAW TABLE ROWS
      for (let row of csv.data) {
        let tr = table.insertRow();
        for (let cell of row) {
          let td = tr.insertCell();
          td.innerHTML = cell;
        }
      }
    }
  });
}- Use the PapaParse library to load a CSV file from the server. Take note of the options.
download: trueThis specifies that"0-language.csv"is a URL and should be fetched from the server.skipEmptyLines: trueSkip empty lines in the CSV file. Recommended, unless you are using blank rows to indicate a “section break” or something.
- On successfully reading and parsing the CSV file, draw the results in
<table id="demoA">. Literally loop through the CSV data and create the table rows/cells.
EXAMPLE 2) SELECT CSV FILE
2A) THE HTML
<!-- (PART A) LOAD CSV LIBRARY -->
<script src="papaparse.min.js"></script>

<!-- (PART B) DEMO TABLE & BUTTON -->
<table id="demoB" class="demo"></table>
<input type="file" accept=".csv" id="picker" onchange="demoB()">
This is the demo above. We will read from a CSV file that the user chooses, instead of loading from the server.
2B) THE JAVASCRIPT
function demoB () {
  // (PART A) READ CSV FILE
  Papa.parse(document.getElementById("picker").files[0], {
    skipEmptyLines: true,

    // (PART B) DRAW CSV FILE
    complete : csv => {
      // (B1) GET + RESET HTML TABLE
      var table = document.getElementById("demoB");
          table.innerHTML = "";

      // (B2) DRAW TABLE ROWS
      for (let row of csv.data) {
        let tr = table.insertRow();
        for (let cell of row) {
          let td = tr.insertCell();
          td.innerHTML = cell;
        }
      }
    }
  });
}
Look no further, there are only 2 small changes.
- Removed
download: trueto indicate “don’t fetch from server”. - The “file source” has been changed to
document.getElementById("picker").files[0], which is the file picker. - The rest of the mechanics are the same.
EXAMPLE 3) THE FIRST ROW IS THE HEADER
function demoC () {
  // (PART A) READ CSV FILE
  Papa.parse(document.getElementById("picker").files[0], {
    skipEmptyLines: true,

    // (PART B) DRAW CSV FILE
    complete : csv => {
      // (B1) GET + RESET HTML TABLE
      var table = document.getElementById("demoC");
      table.innerHTML = "";

      // (B2) DRAW TABLE HEADER
      var thead = table.createTHead(),
          tr = thead.insertRow();
      for (let cell of csv.data[0]) {
        let td = tr.insertCell();
        td.innerHTML = cell;
      }

      // (B3) DRAW TABLE BODY
      var tbody = table.createTBody();
      for (let i=1; i<csv.data.length; i++) {
        let row = csv.data[i],
            tr = tbody.insertRow();
        for (let cell of row) {
          let td = tr.insertCell();
          td.innerHTML = cell;
        }
      }
    }
  });
}
If the first row of the CSV file is the header, some changes need to be made.
- (A) Pick a file or fetch from the server – It’s the same. We will just go with “pick a file here”.
- (B2 & B3) Take note of how we create a separate table header and body now.
- (B2) Generate the table header, loop through the first row of the CSV data.
- (B3) The following rows are the table body.
THE END – A NOTE ON MASSIVE CSV FILES
That’s all for this short tutorial, but a small note before we end – Every device has limited system resources. So yes, you may want to restrict the file size to prevent users from crashing their own browsers… For the “pick CSV file” example, you can do a quick file size check with if (document.getElementById("picker").files[0].size > N) { alert("DANGER!"); return; }
CHEAT SHEET