Once upon a time, a student is working on an online invoice generator when the server went down. She then began to lament about how web apps are useless without a server. Well, that is quite true. But the idea of Web 3.0 is decentralization, and “serverless” is one of those concepts.
In this tutorial, let Master Coffee walk you through an example of a serverless invoice generator. Yes, no server-side scripts and no database – Let’s go!
CODE DOWNLOAD
I have released this under the MIT license, feel free to use it in your own project – Personal or commercial. Some form of credits will be nice though. 🙂
VIDEO TUTORIAL
PART 1) INVOICE HTML PAGE
<form onsubmit="return invoice.print()">
  <!-- (PART A) INVOICE -->
  <div class="header">Invoice</div>
  <div id="inRow">
    <input type="text" id="inNum" placeholder="Invoice Number" required>
    <input type="date" id="inDate" required>
  </div>
  <textarea id="inBill" placeholder="Bill To" required></textarea>

  <!-- (PART B) ITEMS -->
  <div class="header">Items</div>
  <div id="itemsList"></div>
  <div id="itemsAdd" class="irow">
    <input type="number" class="qty" min="1" placeholder="Qty">
    <input type="text" class="item" list="itemsData" placeholder="Item Name" onchange="invoice.price(this)">
    <input type="number" class="price" min="0.00" step="0.01" placeholder="Price Each">
    <input type="button" class="action" value="+" onclick="invoice.add(true)">
  </div>
  <datalist id="itemsData"></datalist>

  <!-- (PART C) TOTALS -->
  <div class="header">Totals</div>
  <div id="totals">Grand Total: $0.00</div>

  <!-- (PART D) CONTROLS -->
  <div id="controls">
    <label id="loader">
      <input type="file" accept=".json" onchange="invoice.load()"> Load
    </label>
    <input type="button" value="Save" onclick="invoice.save()">
    <input type="submit" value="Print">
  </div>
</form>
Let us start with the create/edit invoice page. This should be very straightforward, just a “slightly long-winded HTML form”.
- The invoice number, date, and bill to.
- Invoice items.
- Totals… Master Coffee is lazy and only included the Grand Total here. Add your own tax calculations and additional charges here.
- Controls – Save, load, print.
PART 2) JAVASCRIPT ITEMS & INITIALIZE
2A) ITEMS LIST
var items = {
  "Americano" : 1.11,
  "Cappuccino" : 2.22,
  "Espresso" : 3.33,
  "Latte" : 4.44,
  "Mocha" : 5.55,
};- Since there is no database, the only place to keep the products is in a Javascript object.
- This is only used as “autosuggest” in
<datalist id="itemsData">.
2B) APP INITIALIZE
var invoice = {
  // (PART A) PROPERTIES
  hNum : null,   // html invoice number
  hDate : null,  // html invoice date
  hBill : null,  // html bill to
  hItems : null, // html items list
  hAdd : null,   // html add item row
  hData : null,  // html items datalist
  hTotal : null, // html total amount
  hLoad : null,  // html load invoice

  // (PART B) INIT ITEMS LIST
  init : () => {
    // (B1) GET HTML ELEMENTS
    invoice.hNum = document.getElementById("inNum");
    invoice.hDate = document.getElementById("inDate");
    invoice.hBill = document.getElementById("inBill");
    invoice.hItems = document.getElementById("itemsList");
    invoice.hAdd = document.getElementById("itemsAdd");
    invoice.hData = document.getElementById("itemsData");
    invoice.hTotal = document.getElementById("totals");
    invoice.hLoad = document.querySelector("#loader input[type=file]");

    // (B2) POPULATE ITEMS DATALIST
    for (let i of Object.keys(items)) {
      let row = document.createElement("option")
      row.value = i;
      invoice.hData.appendChild(row);
    }
  },
  // ...
};

// (PART J) START
window.addEventListener("load", invoice.init);
var invoicecontains all of the mechanics.invoice.init()will run on window load. Pretty much just getting a bunch of HTML elements, and populating<datalist id="itemsData">with the items above.
PART 3) JAVASCRIPT ADD & REMOVE ITEMS
// (PART C) SET PRICE EACH (WHEN CHOOSING ITEM)
price : item => { if (items[item.value]) {
  item.nextElementSibling.value = items[item.value];
}},

// (PART D)ADD ITEM
add : calc => {
  // (D1) CLONE NEW ITEM ROW
  let row = invoice.hAdd.cloneNode(true),
      qty = row.querySelector(".qty"),
      item = row.querySelector(".item"),
      price = row.querySelector(".price"),
      act = row.querySelector(".action");
  row.removeAttribute("id");
  qty.required = true;
  qty.setAttribute("onchange", "invoice.total()");
  item.required = true;
  price.required = true;
  price.setAttribute("onchange", "invoice.total()");
  act.value = "X";
  act.setAttribute("onclick", "invoice.remove(this.parentElement)");
  document.getElementById("itemsList").appendChild(row);

  // (D2) RESET ADD ITEM
  for (let i of invoice.hAdd.querySelectorAll("input:not(.action)")) {
    i.value = "";
  }

  // (D3) CALCULATE TOTAL
  if (calc) { invoice.total(); }
},

// (PART E) REMOVE ITEM
remove : row => {
  row.remove();
  invoice.total();
},

// (PART F) CALCULATE TOTAL
total : () => {
  let total = 0;
  for (let row of invoice.hItems.querySelectorAll(".irow")) {
    let qty = parseInt(row.querySelector(".qty").value),
        price = parseFloat(row.querySelector(".price").value);
    if (isNaN(qty) || isNaN(price)) { continue; }
    total += qty * price;
  }
  invoice.hTotal.innerHTML = "Grand Total: $" + total.toFixed(2);
},- (D)
add()To add a new item to the invoice – We clone<div id="itemsAdd">, make some changes to the fields, and insert it into<div id="itemsList">. - (E)
remove()To remove an item from the invoice – Simple delete the entire row. - (C)
price()As above, when the user picks an item that is “registered” invar items, this will also automatically set the price. - (F)
total()Every time the user changes an item quantity or price, recalculate the totals. Once again, add your tax calculations and additional charges here.
PART 4) SAVE INVOICE
// (PART G) SAVE INVOICE
save : () => {
  // (G1) GET INVOICE DATA
  let data = {};
  data.num = invoice.hNum.value;
  data.date = invoice.hDate.value;
  data.bill = invoice.hBill.value;
  data.items = [];
  for (let row of invoice.hItems.querySelectorAll(".irow")) {
    let item = [];
    for (let i of row.querySelectorAll("input:not(.action)")) {
      item.push(i.value);
    }
    data.items.push(item);
  }

  // (G2) CONSTRUCT BLOB & "FORCE DOWNLOAD"
  let url = window.URL.createObjectURL(
    new Blob([JSON.stringify(data)], { type: "application/json" })
  );
  let a = document.createElement("a");
  a.href = url;
  a.download = "invoice.json";
  a.click();
  window.URL.revokeObjectURL(url);
},- Collect all the fields into
var data. - Create a
new Blob()object, put in the data in JSON encoded format. - Force download.
Take note, there’s no form checking here. We allow users to save draft invoices.
PART 5) LOAD INVOICE
// (PART H) LOAD INVOICE
load : () => {
  // (H1) FILE READER
  const reader = new FileReader();

  // (H2) DRAW INVOICE
  reader.onload = e => {
    invoice.hLoad.value = "";
    try {
      let data = JSON.parse(reader.result);
      invoice.hNum.value = data.num;
      invoice.hDate.value = data.date;
      invoice.hBill.value = data.bill;
      invoice.hItems.innerHTML = "";
      for (let row of data.items) {
        invoice.hAdd.querySelector(".qty").value = row[0];
        invoice.hAdd.querySelector(".item").value = row[1];
        invoice.hAdd.querySelector(".price").value = row[2];
        invoice.add();
      }
      invoice.total();
    } catch (e) {
      alert("Error loading file");
      console.error(e);
    }
  };

  // (H3) ERROR READING
  reader.onerror = e => {
    alert("Error loading file");
    console.error(e);
  };

  // (H4) GO!
  reader.readAsText(invoice.hLoad.files[0]);
},- The user picks a JSON file generated by the above
save()function. - Literally – Read the JSON file, decode, and populate the HTML form.
PART 6) PRINT INVOICE
6A) PRINT INVOICE HTML PAGE
<!-- (PART A) YOUR COMPANY -->
<div id="company">
  <img id="cologo" src="logo.png">
  <div id="coinfo">
    Company Name<br>
    Address<br>
    http://your-site.com<br>
    Email: [email protected]<br>
    Tel: 12345678
  </div>
</div>

<!-- (PART B) INVOICE -->
<div id="inHead">SALES INVOICE</div>
<div id="inRow">
  <div id="billto"></div>
  <div id="inData">
    <div id="inNum"></div>
    <div id="inDate"></div>
  </div>
</div>

<!-- (PART C) ITEMS -->
<div id="items">
  <div class="irow ihead">
    <div>Qty</div> <div>Item</div> <div>Price Each</div>
  </div>
</div>

<!-- (PART D) TOTALS -->
<div id="totals"></div>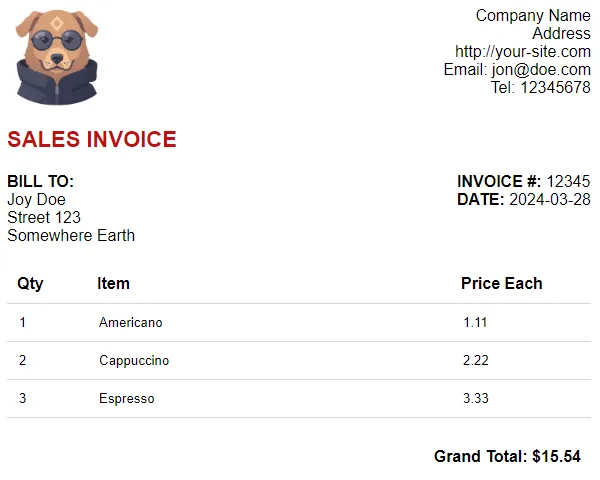
Well, this page is just a template. Feel free to change the design, layout, and CSS.
6B) PRINT INVOICE JAVASCRIPT
// (PART I) PRINT INVOICE
print : () => {
  // (I1) CHECK FOR ITEMS
  if (invoice.hItems.querySelectorAll(".irow").length==0) {
    alert("Please add at least one item.");
    return false;
  }

  // (I2) OPEN PRINT PAGE
  let page = window.open("print.html");
  page.onload = () => {
    // (I2-1) INVOICE
    page.document.getElementById("billto").innerHTML = "<strong>BILL TO:</strong><br>" + invoice.hBill.value.replace(/\n/g, "<br>");
    page.document.getElementById("inNum").innerHTML = "<strong>INVOICE #: </strong>" + invoice.hNum.value;
    page.document.getElementById("inDate").innerHTML = "<strong>DATE: </strong>" + invoice.hDate.value;

    // (I2-2) ITEMS
    for (let row of invoice.hItems.querySelectorAll(".irow")) {
      let clone = row.cloneNode(true);
      clone.querySelector(".action").remove();
      for (let i of clone.querySelectorAll("input")) { i.readOnly = true; }
      page.document.getElementById("items").appendChild(clone);
    }

    // (I2-3) TOTALS
    page.document.getElementById("totals").innerHTML = invoice.hTotal.innerHTML;

    // (I2-4) PRINT INVOICE
    page.print();
  };
  return false;
}
The final part of the Javascript. Very simple, transfer the invoice form data onto the print page.
P.S. Take note that this function is fired by a submit button – Form checking will be triggered, we don’t allow users to generate “incomplete invoices”.
PART 7) PROGRESSIVE WEB APP
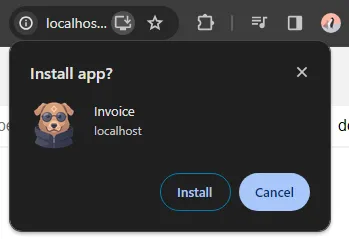
At this stage, this is already a fully functional web app. But we need to add a few more things to turn it into a “true offline serverless web app”.
7A) MANIFEST FILE
{
  "short_name": "Invoice Generator",
  "name": "Invoice",
  "icons": [{
    "src": "logo.png",
    "sizes": "512x512",
    "type": "image/png"
  }],
  "start_url": "/invoice.html",
  "scope": "/",
  "background_color": "white",
  "theme_color": "white",
  "display": "standalone"
}
The manifest file is what it is – Contains information about the app name, icon, start URL, colors, settings, etc…
7B) HTML HEADER
<!-- (PART E) PROGRESSIVE WEB APP -->
<link rel="icon" href="logo.png" type="image/png">
<link rel="manifest" href="manifest.json">
<script>if ("serviceWorker" in navigator) {
  // (E1) REGISTER SERVICE WORKER
  navigator.serviceWorker.register("worker.js", {scope: "/"});

  // (E2) CACHE WEB APP FILES
  caches.open("invoice").then(cache => cache.addAll([
    "invoice.css", "invoice.html", "invoice.js", "items.js",
    "logo.png", "manifest.json", "print.css", "print.html"
  ]));
}</script>
Next, we insert a small snippet in the head section of the invoice page to:
- Specify the manifest file.
- Register a service worker.
- Create a cache to store all the app files – This is not the browser cache, but a different persistent app cache.
7C) SERVICE WORKER
// (PART A) LOAD FILE FROM CACHE, FALLBACK TO NETWORK IF NOT FOUND
self.addEventListener("fetch", e => e.respondWith(
  caches.match(e.request).then(r => r || fetch(e.request))
));
Once registered, this service worker will run in the background. What it does – Load the requested file from the cache if it is found, else fallback to load from the server. That is, effectively turning this into an offline web app.
THE END – LIMITATIONS
That’s all for this tutorial and sharing. Before we end, I will do a quick highlight of the limitations (and possible problems) of this serverless invoice generator:
- There is no database, all invoices are saved in JSON files on the user’s device.
- If users share and copy the invoice files, you may end up with multiple different versions.
- You can create a shared folder within your network to keep the invoice files, but isn’t that a “server”? Might as well implement a database.
- There is no security and accountability. There is no login, anyone can create an invoice, and there is no way to trace who created/updated the invoices.
Yep, this serverless app only works great in small shops and companies. If you want an “actual invoice system”, there’s no running away from server-side scripts and databases.