Once upon a time, a student loaded an entire library just to add a collapsible list to a simple project. Young ones these days really do think that loading bloat and coding convenience outweighs performance… Heck no, here’s how you create a collapsible list in pure HTML Javascript WITHIN MINUTES. Let’s go.
CODE DOWNLOAD
I have released this under the MIT license, feel free to use it in your own project – Personal or commercial. Some form of credits will be nice though. 🙂
VIDEO TUTORIAL
COLLAPSIBLE LIST DEMO
- Grandparent One
- Parent One
- Child One
- Child Two
- Child Three
- Parent Two
- Parent Three
- Parent One
- Grandparent Two
- Grandparent Three
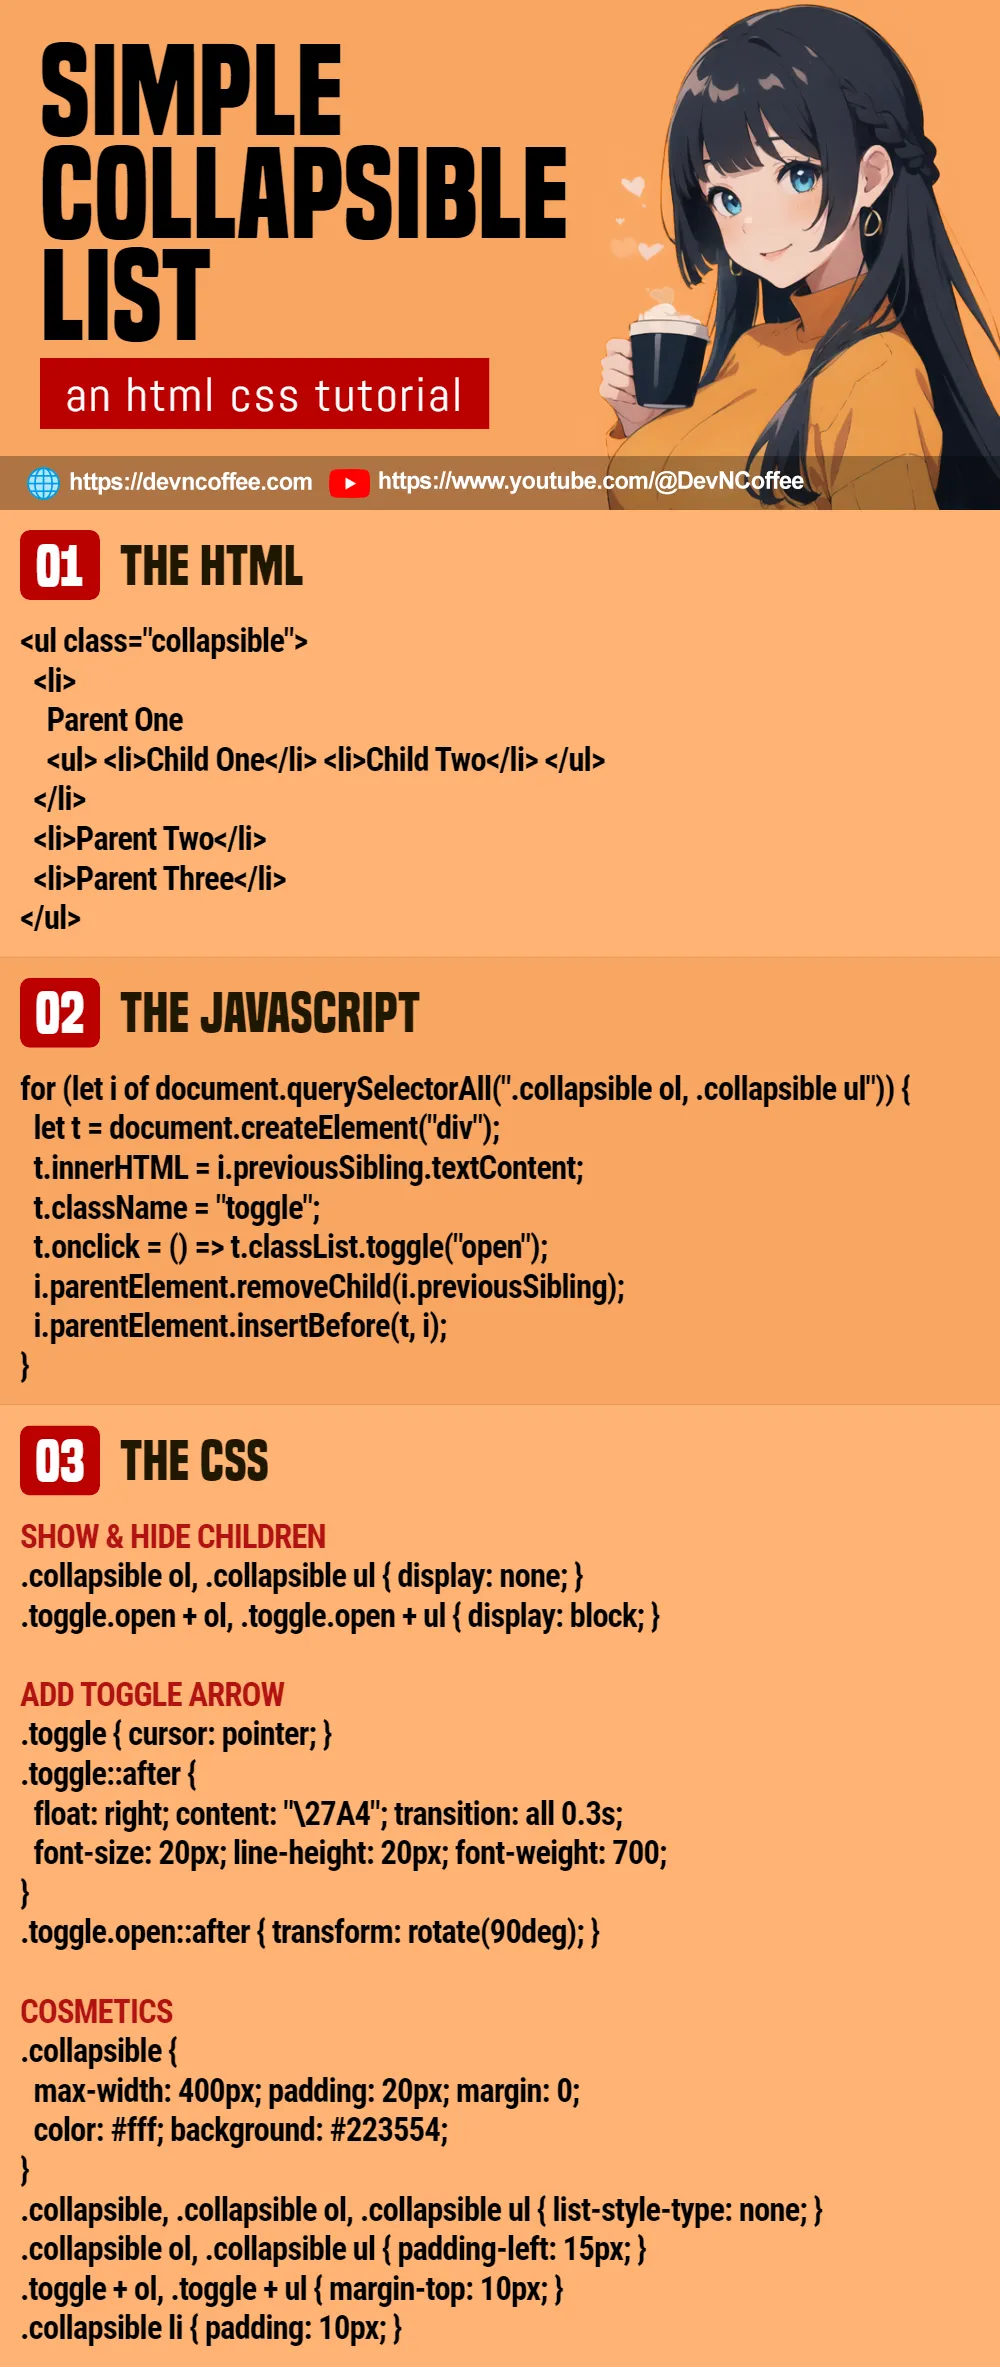
PART 1) HTML – REGULAR NESTED LIST
<ul class="collapsible">
  <li>
    Grandparent One
    <ul>
      <li>
        Parent One
        <ul>
          <li>Child One</li>
          <li>Child Two</li>
          <li>Child Three</li>
        </ul>
      </li>
      <li>Parent Two</li>
      <li>Parent Three</li>
    </ul>
  </li>
  <li>Grandparent Two</li>
  <li>Grandparent Three</li>
</ul>
Start with your “regular nested list”, add a collapsible CSS class to it.
PART 2) JAVASCRIPT – CREATE “TOGGLE BUTTONS”
window.addEventListener("load", () => {
  for (let i of document.querySelectorAll(".collapsible ol, .collapsible ul")) {
    let t = document.createElement("div");
    t.innerHTML = i.previousSibling.textContent;
    t.className = "toggle";
    t.onclick = () => t.classList.toggle("open");
    i.parentElement.removeChild(i.previousSibling);
    i.parentElement.insertBefore(t, i);
  }
});- On window load, loop through all the sub list items.
- Wrap the title of each section in a “toggle button” –
<div class="toggle" onclick="this.classList.toggle('open')">TITLE</div>. - Yes, clicking on the “toggle button” simply sets an
openCSS class.
PART 3) CSS – SHOW & HIDE SECTIONS
/* (PART A) REMOVE BULLETS */
.collapsible, .collapsible ol, .collapsible ul {
  list-style-type: none;
}

/* (PART B) COLLAPSIBLE LIST CONTAINER */
.collapsible {
  max-width: 400px; /* optional */
  padding: 20px; margin: 0;
  color: #fff; background: #223554;
}

/* (PART C) CONTROL SPACING & INDENTATION */
.collapsible ol, .collapsible ul { padding-left: 15px; }
.toggle + ol, .toggle + ul { margin-top: 10px; }
.collapsible li { padding: 10px; }

/* (PART D) SHOW & HIDE CHILDREN */
.collapsible ol, .collapsible ul { display: none; }
.toggle.open + ol, .toggle.open + ul { display: block; }

/* (PART E) ADD TOGGLE ARROW */
.toggle { cursor: pointer; }
.toggle::after {
  float: right; content: "\27A4";
  font-size: 20px; line-height: 20px; font-weight: 700;
  transition: all 0.3s;
}
.toggle.open::after { transform: rotate(90deg); }
Most of these are just cosmetics, the only important mechanic is part D:
.collapsible ol, .collapsible ul { display: none; }Hide all the sub-sections by default..toggle.open + ol, .toggle.open + ul { display: block; }Remember the “toggle button” we added in Javascript? Clicking on it will toggle anopenCSS class and show the sub-section.
THE END – THERE’S A SIMPLER WAY!?
That’s all for this tutorial, go ahead and customize the list however you wish. But before we end, there’s something I want to add on… I kind of lied, and there’s an “even easier way” to create a collapsible list.
<details>
  <summary>Section Title</summary>
  <p>Your Text Here.</p>
</details>
Yes, this works. But I will advise against using <details><summary>, as it is semantically “not a list”.
CHEAT SHEET