Need to save some data in your web app? Only to find there are no obvious ways to do so in Javascript? Well, the “saving problem” is deeply rooted in security concerns – Imagine visiting a website and random suspicious files are suddenly saved in your device… Not cool.
So yep, while saving files and data in modern Javascript is possible, it is limited and rather complicated. Let Master Coffee walk you through some possible methods and examples – Let’s go.
CODE DOWNLOAD
I have released this under the MIT license, feel free to use it in your own project – Personal or commercial. Some form of credits will be nice though. 🙂
VIDEO TUTORIAL
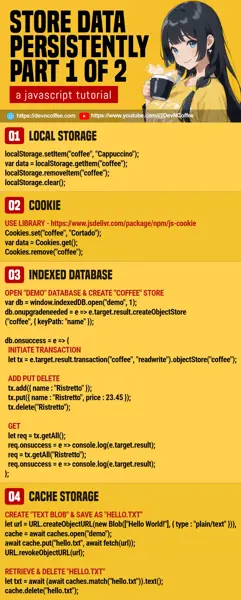
1) LOCAL STORAGE
// (PART A) STORE ITEM
localStorage.setItem("coffee", "Cappuccino");

// (PART B) GET ITEM
var data = localStorage.getItem("coffee");
console.log(data);

// (PART C) REMOVE ITEM
localStorage.removeItem("coffee");
localStorage.clear();
Local storage is one of the simplest methods, just think of it as a place to keep “persistent variables”. But take note, it can only accept strings and numbers. No arrays, objects, and functions.
localStorage.setItem(NAME, VALUE)SaveNAME = VALUEinto the local storage.localStorage.getItem(NAME)Get the value ofNAMEfrom the local storage.localStorage.removeItem(NAME)RemoveNAMEfrom the local storage.localStorage.clear()Remove all “local storage variables”.
2) COOKIE
<!-- (PART A) LOAD JS COOKIE LIBRARY -->
<script src="https://cdn.jsdelivr.net/npm/[email protected]/dist/js.cookie.min.js"></script>

// (PART B) SET COOKIE
Cookies.set("coffee", "Cortado");

// (PART C) GET COOKIES
var data = Cookies.get();
console.log(data);

// (PART D) REMOVE COOKIE
Cookies.remove("coffee");
Cookies are another “obvious place” to keep “simple values” that will also be sent to the server. But take note that we are using a Javascript Cookie library here. While it is possible to work with cookies directly using document.cookie, it is a headache to deal with the formatting and syntax manually.
Cookies.set(NAME, VALUE)Set aNAME=VALUEcookie.Cookies.get()Get all cookies.Cookies.get(NAME)Get the value of the cookie withNAME.Cookies.remove(NAME)Remove the cookie withNAME.
3) INDEXED DATABASE
// (PART A) OPEN "DEMO" DATABASE
var db = window.indexedDB.open("demo", 1);

// (PART B) CREATE "COFFEE" OBJECT STORE
db.onupgradeneeded = e => {
  db = e.target.result;
  db.onerror = e => console.error(e);
  db.createObjectStore("coffee", { keyPath: "name" });
};

// (PART C) ON SUCCESSFULLY OPENING "DEMO" DATABASE
db.onsuccess = e => {
  // (C1) TRANSACTION FOR "COFFEE" OBJECT STORE
  const tx = e.target.result
    .transaction("coffee", "readwrite")
    .objectStore("coffee");

  // (C2) ADD OBJECT
  let req = tx.add({
    name : "Ristretto",
    price : 12.34
  });
  req.onsuccess = e => console.log("Add OK");
  req.onerror = e => console.error(e);

  // (C3) PUT/UPDATE OBJECT
  req = tx.put({
    name : "Ristretto",
    price : 23.45,
    strength : "Very strong"
  });
  req.onsuccess = e => console.log("Put OK");
  req.onerror = e => console.error(e);

  // (C4) GET ALL
  req = tx.getAll();
  req.onsuccess = e => console.log(e.target.result);
  req.onerror = e => console.error(e);

  // (C5) GET
  req = tx.getAll("Ristretto");
  req.onsuccess = e => console.log(e.target.result);
  req.onerror = e => console.error(e);

  // (C6) DELETE
  req = tx.delete("Ristretto");
  req.onsuccess = e => console.log("Delete OK");
  req.onerror = e => console.error(e);
};
Indexed databases are much more capable than local storage, but can be confusing. This is just a barebones example, it’s impossible to cover everything in a single script… I will recommend that you read through the proper documentation after this.
- The first step is to open an indexed database with
window.indexedDB.open(NAME, VERSION). - For first-time users,
onupgradeneededwill be fired to create the object stores.- Object stores can be created with
createObjectStore(NAME, { keyPath: PROPERTY, autoIncrement: true/false }. - For those familiar with RDB, object stores are the “tables”.
- But unlike RDB, object stores don’t have a “strict table structure”. They will save any object you throw at it.
- Object stores can be created with
- When the database is successfully opened, do the “usual stuff”.
- First, select an object store and initiate a transaction –
let tx = e.target.result.transaction(STORE, "readwrite").
.objectStore(STORE) - To add an object to the store –
tx.add(OBJECT). - To update an object in the store –
tx.put(OBJECT). - To get all objects from the store –
tx.getAll(). - To get a specific object from the store –
tx.getAll(KEY). - To delete an object from the store –
tx.delete(KEY).
- First, select an object store and initiate a transaction –
4) CACHE STORAGE
(async () => {
  // (PART A) CREATE/OPEN "DEMO" CACHE
  let cache = await caches.open("demo");

  // (PART B) CREATE A "TEXT FILE"
  let blob = new Blob(["Hello World!"], { type : "plain/text" }),
  url = URL.createObjectURL(blob);

  // (PART C) SAVE "TEXT FILE" INTO CACHE AS "HELLO.TXT"
  let res = await fetch(url);
  await cache.put("hello.txt", res);
  URL.revokeObjectURL(url);

  // (PART D) RETRIEVE "HELLO.TXT"
  res = await caches.match("hello.txt");
  res = await res.text();
  console.log(res);

  // (PART E) DELETE "HELLO.TXT"
  cache.delete("hello.txt");
})();
A “cache storage” is a sandbox for storing files, mainly to support offline web apps. With some creativity, we can use it to store data.
let cache = await caches.open(NAME)Just like an indexed database, we first open/create a cache.- Create a new text blob and its object URL.
cache.put(FILE NAME, FETCHED OBJECT)Fetch the text blob’s URL, and save it into the cache as a text file. Funky.cache.match(FILE NAME)We can retrieve the saved file from the cache with a file match.cache.delete(FILE NAME)Delete the text file from cache storage.
Once again, follow up with the proper documentation if you want to learn more.
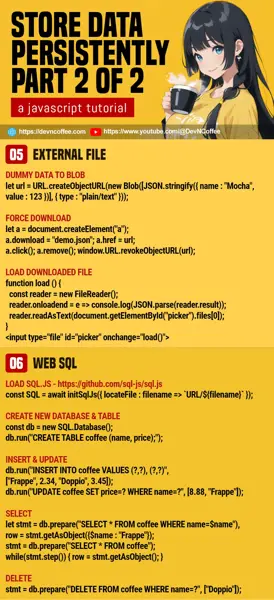
5) EXTERNAL FILE
<!-- (PART A) EXPORT TO FILE -->
<script>
function demoA () {
  // (A1) DUMMY DATA
  let data = { name : "Mocha", value : 123 };

  // (A2) DUMMY DATA TO BLOB
  let blob = new Blob([JSON.stringify(data)], { type : "plain/text" }),
  url = URL.createObjectURL(blob);

  // (A3) FORCE DOWNLOAD
  let a = document.createElement("a");
  a.download = "demo.json";
  a.href = url;
  a.click(); a.remove(); window.URL.revokeObjectURL(url);
}
</script>
<input type="button" value="Export" onclick="demoA()">

 <!-- (PART B) READ FROM FILE -->
<script>
function demoB () {
  // (B1) SELECTED FILE
  let file = document.getElementById("picker").files[0];

  // (B2) READ SELECTED FILE
  const reader = new FileReader();
  reader.onloadend = e => {
    let data = JSON.parse(reader.result);
    console.log(data);
  };
  reader.readAsText(file);
}
</script>
<input type="file" id="picker" onchange="demoB()">
This is not quite “in the browser”, but a possible alternative nonetheless.
- This is the same “create a text blob” as the previous example, but we force it as a download instead.
- On picking the previously downloaded file, we create a file reader to read it.
6) WEBSQL
6A) INSERT UPDATE DELETE SELECT
<!-- (PART A) LOAD SQL JS -->
<script src="https://cdnjs.cloudflare.com/ajax/libs/sql.js/1.10.3/sql-wasm.min.js"></script>

<script>
(async () => {
  // (PART B) INITIALIZE SQLJS
  const SQL = await initSqlJs({
    locateFile : filename => `https://cdnjs.cloudflare.com/ajax/libs/sql.js/1.10.3/${filename}`
  });

  // (PART C) CREATE NEW DATABASE
  const db = new SQL.Database();
  db.run("CREATE TABLE coffee (name, price)");

  // (PART D) INSERT & UPDATE
  db.run(
    "INSERT INTO coffee VALUES (?,?), (?,?)",
    ["Frappe", 2.34, "Doppio", 3.45]
  );
  db.run("UPDATE coffee SET price=? WHERE name=?", [8.88, "Frappe"]);

  // (PART E) SELECT ROW
  let stmt = db.prepare("SELECT * FROM coffee WHERE name=$name"),
  row = stmt.getAsObject({$name : "Frappe"});
  console.log(row);

  // (PART F) SELECT MULTIPLE ROWS
  stmt = db.prepare("SELECT * FROM coffee");
  while(stmt.step()) {
    row = stmt.getAsObject();
    console.log(row);
  }

  // (PART G) DELETE
  stmt = db.prepare("DELETE FROM coffee WHERE name=?", ["Doppio"]);
})();
Once upon a time, there were plans to support an SQLite database directly in browsers. But that plan was eventually given up in favor of indexed databases. That said, there is a third-party library that we can use to support WebSQL.
- The library that we are using is SQL.JS.
- SQL.JS is based on web assembly (WASM), this bit of initialization points to where the WASM file is at.
- Create
const db = new SQL.Database()and fire away withdb.run(SQL, DATA). - Don’t think this needs explanation –
INSERTandUPDATESQL queries. - For
SELECTqueries –- Prepare the statement
let stmt = db.prepare(SQL)first. - Then get the result as an object –
stmt.getAsObject().
- Prepare the statement
- To fetch multiple rows –
- Prepare the statement as usual.
- Use
while(stmt.step()) { ... }to loop through the results.
6B) EXPORT DATABASE
// (PART H) EXPORT - PUT DATABASE.SQLITE INTO YOUR HTTP FOLDER
// OR DIRECTLY POST TO YOUR SERVER & SAVE IT
let binarray = await db.export(),
blob = new Blob([binarray], { type : "application/octet-stream" }),
url = window.URL.createObjectURL(blob),
a = document.createElement("a");
a.download = "database.sqlite";
a.href = url;
a.click(); a.remove(); window.URL.revokeObjectURL(url);

// (PART I) LOAD DATABASE - REPLACE PART C
let res = await fetch("database.sqlite");
res = new Uint8Array(await res.arrayBuffer());
const db = new SQL.Database(res);
Take note that the database only exists in the memory. All the data will be lost if you don’t export and save it somewhere.
- (H) In this example, we will export the database and force a download. Alternatively, you can:
- Upload with
fetch()and save it on the server. - Or save it in the cache storage.
- Upload with
- (I) To “restore” the database, feed the saved file back into
new SQL.Database().
THE END – POSSIBLY USEFUL FILE SYSTEM API
That’s all for this short tutorial. From “easy to advanced” storage, I hope one of these methods has worked for you. One last bit that may be useful to some of you guys, we actually have a file system API in Javascript that can directly write to files. But take note, it is experimental at the time of writing and only supported on some browsers.
CHEAT SHEET


