Once upon a time, a student had to place a block of text on an image. He chose to do it the traditional way, by directly embedding text on the image. While it worked, it is a pain to update the image. So here it is, let Master Coffee show you some simpler ways to layer text over an image – Let’s go!
CODE DOWNLOAD
I have released this under the MIT license, feel free to use it in your own project – Personal or commercial. Some form of credits will be nice though. 🙂
VIDEO TUTORIAL
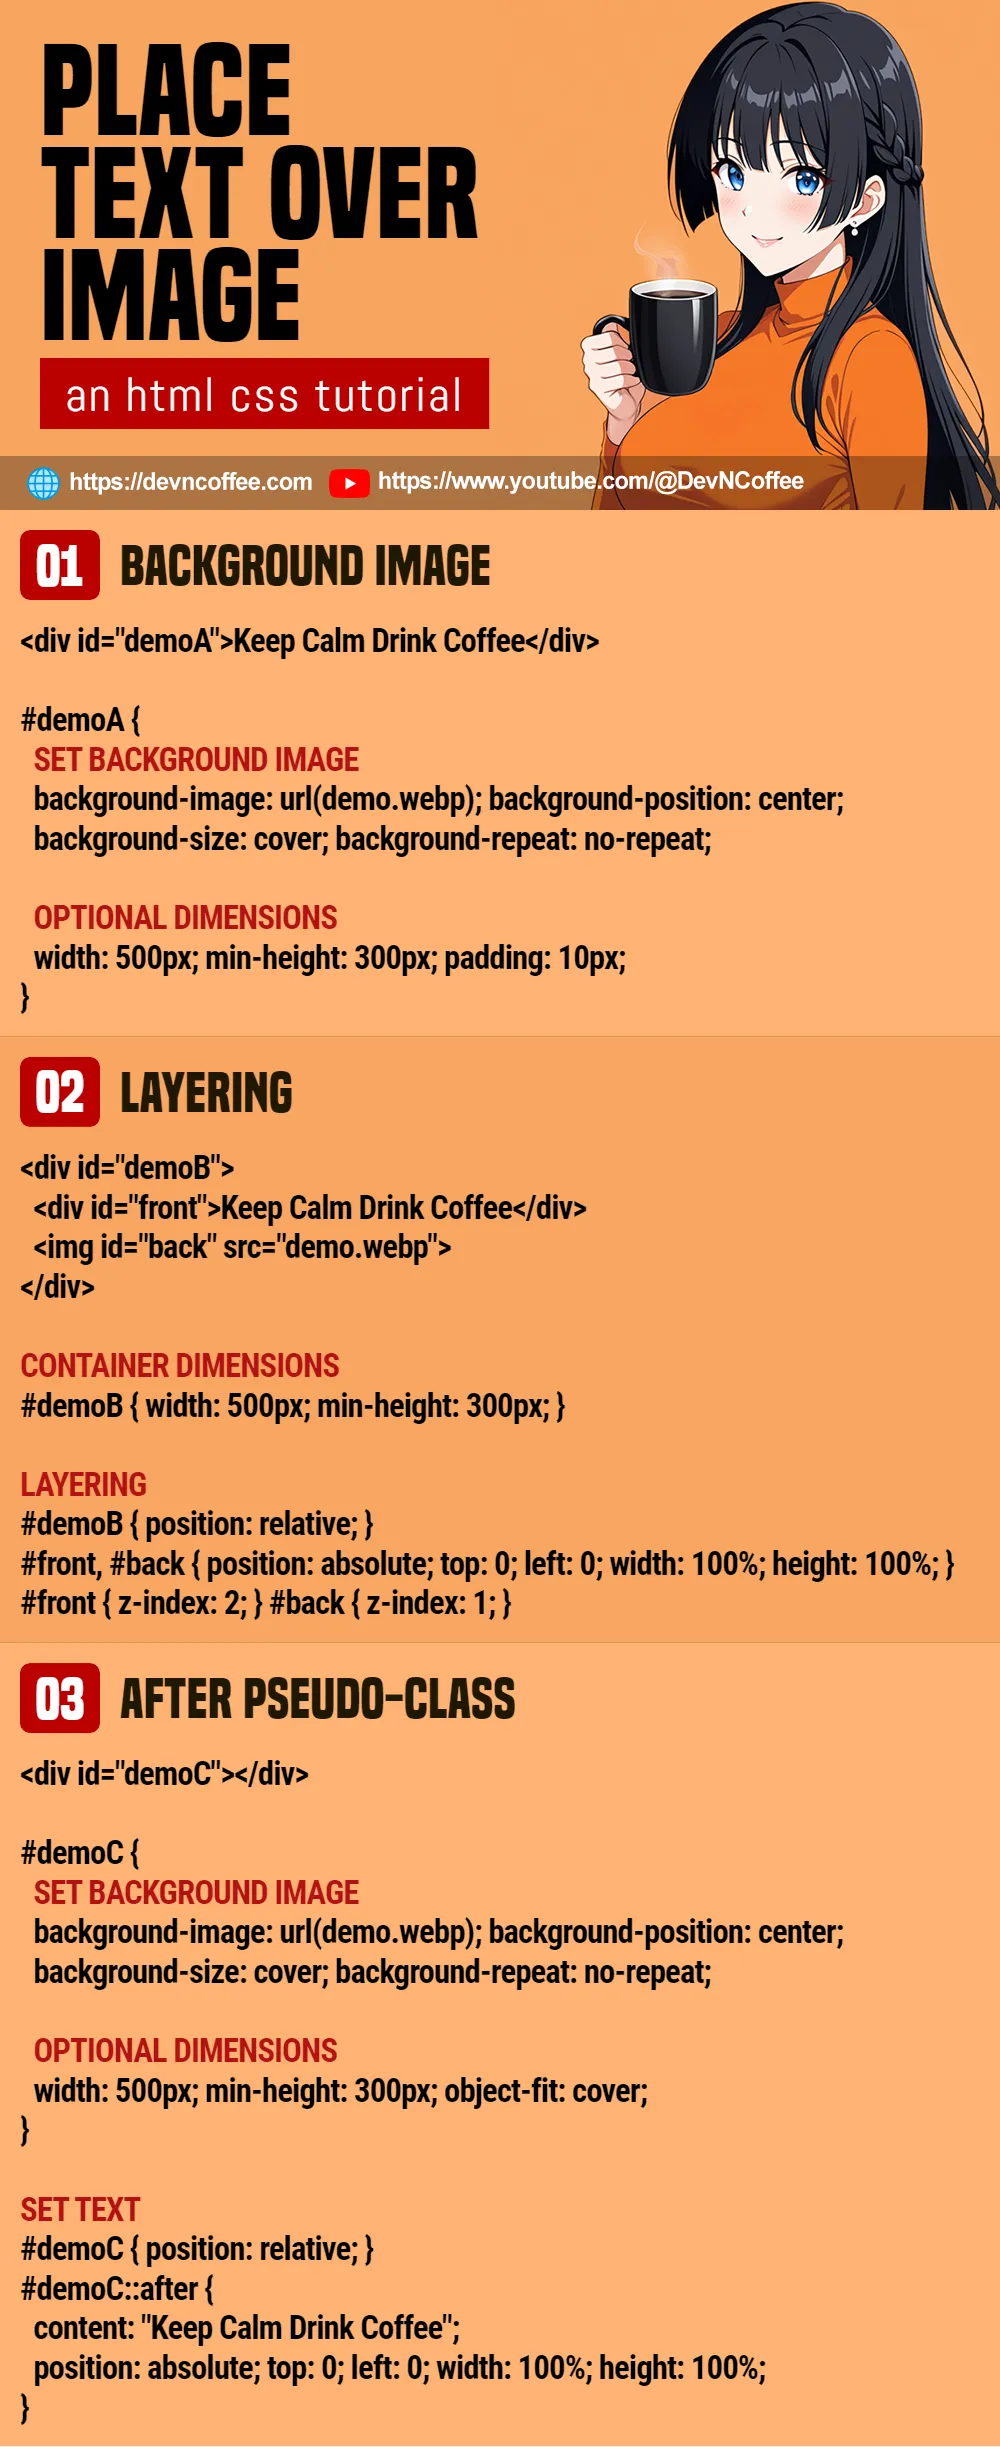
METHOD 1) BACKGROUND IMAGE
<div id="demoA">
  Keep Calm Drink Coffee
</div>#demoA {
/* (PART A) SET BACKGROUND IMAGE */
background-image: url(demo.webp);
background-position: center;
background-size: cover;
background-repeat: no-repeat;
/* (PART B) OPTIONAL DIMENSIONS */
width: 500px;
min-height: 300px;
padding: 10px;
/* (PART C) OPTIONAL CENTER TEXT */
display: flex;
align-items: center;
justify-content: center;
/* (PART D) OPTIONAL TEXT COSMETICS */
font-size: 24px;
color: #fff;
text-shadow: 0px 0px 5px #000;
}- Create a
<div id="demoA">container, put the text inside. - (A) Set the image as the background, and you have “text over image”. The end.
- (B) You may want to set the dimensions of the container, so the image shows up properly.
- (C & D) The rest are pretty much cosmetics – Set the font, size, color, alignment, etc…
METHOD 2) LAYERING
<div id="demoB">
  <div id="demoBFront">Keep Calm Drink Coffee</div>
  <img id="demoBBack" src="demo.webp">
</div>/* (PART A) CONTAINER DIMENSIONS */
#demoB {
width: 500px;
min-height: 300px;
}
/* (PART B) LAYERING */
#demoB { position: relative; }
#demoBFront, #demoBBack {
position: absolute; top: 0; left: 0;
width: 100%; height: 100%;
}
#demoBFront { z-index: 2; }
#demoBBack { z-index: 1; }
/* (PART C) FRONT COSMETICS */
#demoBFront {
display: flex;
align-items: center;
justify-content: center;
font-size: 24px;
color: #fff;
text-shadow: 0px 0px 5px #000;
background: rgba(255, 255, 255, 0.2);
}
/* (PART D) BACK COSMETICS */
#demoBBack {
object-fit: cover;
opacity: 0.7;
filter: blur(3px);
}
Sadly, we cannot blur and fade a background image in CSS at the time of writing. So if you want these “extra effects”, layering is the only way to go.
- Create a
<div id="demoB">container as usual. But now, separate the text<div id="demoBFront">Keep Calm Drink Coffee</div>and the image<img id="demoBBack" src="demo.webp">. - To layer the text and image:
- (B) Set the container to
position: relativeand the layers toposition: absolute; top: 0; left: 0. - (A) Set the
width heightof the container. - (B) Then, set both layers to follow the dimensions of the container with
width: 100%; height: 100%;. - (B) Lastly, place the text in front with
z-index: 2and the image behind withz-index: 1.
- (B) Set the container to
- (C & D) That’s about it, the rest are cosmetics – Blur, opacity, color, alignment, size, etc…
METHOD 3) BEFORE/AFTER PSEUDO-CLASS
<div id="demoC"></div>/* (PART A) CONTAINER */
#demoC {
/* (A1) SET BACKGROUND IMAGE */
background-image: url(demo.webp);
background-position: center;
background-size: cover;
background-repeat: no-repeat;
/* (A2) OPTIONAL DIMENSIONS */
width: 500px;
min-height: 300px;
object-fit: cover;
}
/* (PART B) AFTER PSEUDO-CLASS */
#demoC { position: relative; }
#demoC::after {
/* (B1) SET TEXT */
content: "Keep Calm Drink Coffee";
position: absolute; top: 0; left: 0;
width: 100%; height: 100%;
/* (B2) OPTIONAL : CENTER TEXT */
display: flex;
align-items: center;
justify-content: center;
/* (B3) OPTIONAL : TEXT COSMETICS */
font-size: 24px;
color: #fff;
text-shadow: 0px 0px 5px #000;
}
/* (PART C) OPTIONAL : COLOR OVERLAY */
#demoC::before {
content: "";
position: absolute; top: 0; left: 0;
width: 100%; height: 100%;
background: rgba(255, 255, 255, 0.3);
}This final alternative is a bit… funky.
- As you can see, the
<div>container is totally empty. - (A1) We set the image as the background.
- (B1) Then, set the text in the
::afterpseudo-class. - (B) As with the previous example, we stack text (
::afterpseudo-class) on top of the image. - That’s about it, the rest are cosmetics. In a similar manner, we can also use
::beforeas a “color overlay”.
THE END
That’s all for this short tutorial and sharing. Before we end, here are two more tutorials that may interest you:
- If you want to add text to images permanently, we can actually do so programmatically with Javascript.
- For more “funky text styling”, check out my tutorial on transparent text.
CHEAT SHEET