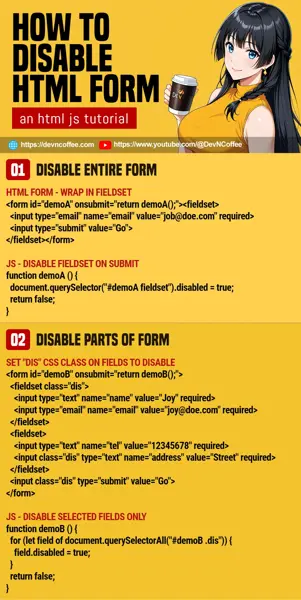
Once upon a time a student disabled a form by manually getting each and every field, because “we cannot disable the form element itself”. Well, there are a few tricks to disabling a form. Let Master Coffee show you how, let’s go.
CODE DOWNLOAD
I have released this under the MIT license, feel free to use it in your own project – Personal or commercial. Some form of credits will be nice though. 🙂
VIDEO TUTORIAL
1) DISABLE ENTIRE FORM
1A) THE HTML
<!-- (PART A1) WRAP IN FIELDSET -->
<form id="demoA" onsubmit="return demoA();">
<fieldset>
  <input type="email" name="email" value="[email protected]" required>
  <input type="submit" value="Go">
</fieldset>
</form>- Here’s the thing – We cannot disable the
<form>itself, but we can disable the form sections. - So wrap your form in an “inner layer” of
<fieldset>.
1B) THE JAVASCRIPT
// (PART A2) DISABLE FORM ON SUBMIT
function demoA () {
  document.querySelector("#demoA fieldset").disabled = true;
  return false;
}
Then, a little bit of Javascript to set <fieldset disabled> on form submit.
2) OVERLAY FORM
2A) THE HTML
<!-- (PART B1) OVERLAY FORM -->
<form id="demoB" onsubmit="return demoB();">
  <div id="blocker"></div>
  <input type="email" name="email" value="[email protected]" required>
  <input type="submit" value="Go">
</form>
Take note, there is an “additional layer” of <div id="blocker"> in the form.
2B) THE CSS
/* (PART B2) OVERLAY BLOCKER */
#demoB { position: relative; }
#blocker {
  display: none;
  position: absolute; top: 0; left: 0; z-index: 99;
  width: 100%; height: 100%;
  background: rgba(0, 0, 0, 0.5);
}
The idea of <div id="blocker"> is to “block” the entire form, so the user cannot make any further changes.
2C) THE JAVASCRIPT
// (PART B3) DISPLAY BLOCKER ON SUBMIT
function demoB () {
  document.querySelector("#blocker").style.display = "block";
  document.querySelector("#demoB input[type=submit").disabled = true;
  return false;
}
Lastly, a little bit of Javascript to show the form blocker on submit. Also, it is best to disable the submit button too.
3) DISABLE PART OF FORM
3A) THE HTML
<!-- (PART C1) HTML FORM -->
<form id="demoC" onsubmit="return demoC();">
  <fieldset class="dis">
    <input type="text" name="name" value="Joy" required>
    <input type="email" name="email" value="[email protected]" required>
  </fieldset>

  <fieldset>
    <input type="text" name="tel" value="12345678" required>
    <input class="dis" type="text" name="address" value="Street" required>
  </fieldset>

  <input class="dis" type="submit" value="Go">
</form>
Take note, we attach a dis CSS class on fields that we want to disable.
3B) THE JAVASCRIPT
// (PART C2) DISPLAY BLOCKER ON SUBMIT
function demoC () {
  for (let field of document.querySelectorAll("#demoC .dis")) {
    field.disabled = true;
  }
  return false;
}
Loop through all the selected fields, disable them on form submit.
THE END
That’s all for this short tutorial and sharing. Now that you know the secrets to disabling an HTML form, here’s another guide that may interest you – How to submit an HTML form without reloading.
CHEAT SHEET

