Need to resize an image in your web app? Yes, we can do it directly in Javascript, no third-party libraries required. Let Master Coffee walk you through an example – Let’s go!
CODE DOWNLOAD
I have released this under the MIT license, feel free to use it in your own project – Personal or commercial. Some form of credits will be nice though. 🙂
VIDEO TUTORIAL
JS RESIZE IMAGE DEMO
This demo will resize the selected image to 50% and force a download – No uploads will happen, everything is processed in your browser.
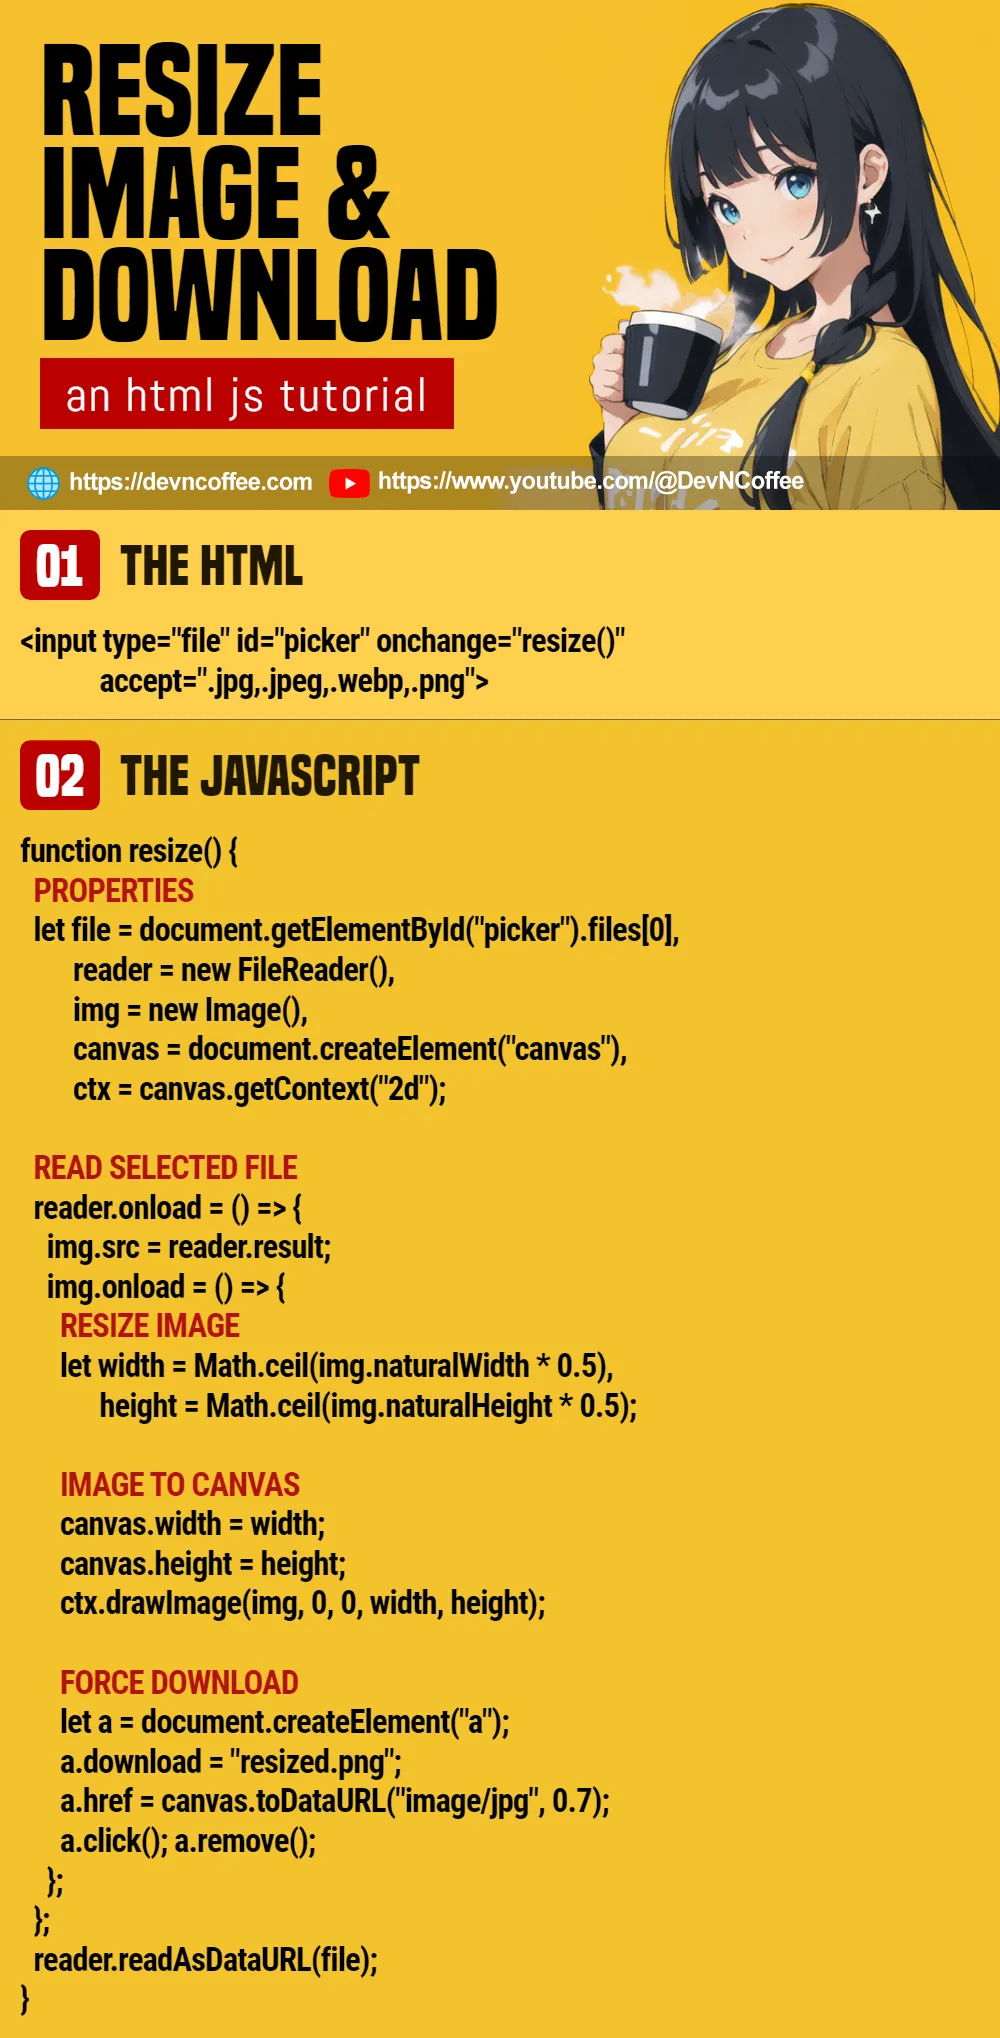
PART 1) THE HTML
<input type="file" id="picker" accept=".jpg,.jpeg,.webp,.png" onchange="resize.go()">- We only need a file picker that accepts image files for the HTML.
- Just one quick note, most modern browsers are capable of handling the “common image formats” –
jpg, gif, webp, png. - But if you want to work with “special” or “raw camera” images, that will be difficult or impossible at the time of writing.
PART 2) RESIZE IMAGE WITH JAVASCRIPT
var resize = {
  // (PART A) PROCEED TO RESIZE IMAGE
  go : () => {
    // (A1) PROPERTIES
    let file = document.getElementById("picker").files[0],
        reader = new FileReader(),
        img = new Image(),
        canvas = document.createElement("canvas"),
        ctx = canvas.getContext("2d");

    // (A2) READ SELECTED FILE
    reader.onload = () => {
      // (A2-1) SELECTED FILE TO IMAGE
      img.src = reader.result;
      img.onload = () => {
        // (A2-2) RESIZE IMAGE
        let width = Math.ceil(img.naturalWidth * 0.5),
            height = Math.ceil(img.naturalHeight * 0.5);

        // (A2-3) IMAGE TO CANVAS
        canvas.width = width;
        canvas.height = height;
        ctx.drawImage(img, 0, 0, width, height);

        // (A2-4) "POST PROCESS"
        resize.toPage(canvas); // add to page
        // resize.toDown(canvas); // force download
        // resize.toUp(canvas); // upload to server
      };
    };
    reader.readAsDataURL(file);
  },
  ...
};
As you can see, resize.go() is called when a file is selected. The resize process is long-winded, but a quick trace and explanation:
- (A1) For a start, we get the selected file from the file picker –
file = document.getElementById("picker").files[0] - (A2) Create a
FileReader()to read the selected file as a data URL. - (A2-1) When the image file is loaded, we “put” the image into an image tag –
<img src="SELECTED-IMAGE-FILE-DATA">. - (A2-2) To resize the image, we first calculate the new dimensions. In this example, we will scale the original down by 50%.
- (A2-3) Set the image onto a canvas.
- (A2-4) That’s all. The “post-process” is different depending on what you want to do. See the next step.
TLDR – File Picker > File Reader > Image > Canvas Resize > Upload/Download/Add to page
PART 3) RESIZED IMAGE DISPOSITION
3A) INSERT RESIZED IMAGE INTO PAGE
// (PART B) ADD RESIZED IMAGE TO PAGE
toPage : canvas => {
  // (B1) DIRECTLY ADD THE CANVAS
  document.body.appendChild(canvas);

  // (B2) OR CONVERT TO <IMG>
  let img = new Image();
  img.src = canvas.toDataURL("image/webp", 0.7);
  document.body.appendChild(img);
},- You can directly insert the canvas into the page.
- Or create an
<img>tag, set the canvas as the image source. - Take note of
canvas.toDataURL("image/webp", 0.7). The0.7is the image quality and this is an optional parameter – 0 is the worst quality and 1 is the best quality.
3B) FORCE DOWNLOAD RESIZED IMAGE
// (PART C) FORCE DOWNLOAD
toDown : canvas => {
  let a = document.createElement("a");
  a.download = "resized.jpg";
  a.href = canvas.toDataURL("image/jpg", 1.0);
  a.click();
  a.remove();
},
A good old trick:
- Create an anchor
<a>tag. - Set the canvas as the anchor tag’s “link”.
- Set the file name.
- Click on the anchor tag to initiate the download and remove it.
3C) UPLOAD RESIZED IMAGE TO SERVER
// (PART D) UPLOAD IMAGE
toUp : canvas => {
  // (D1) CANVAS TO BLOB
  canvas.toBlob(
    blob => {
      // (D2) ATTACH BLOB AS FORM DATA
      let data = new FormData();
      data.append("file", new File([blob], "collage.webp"));

      // (D3) UPLOAD TO SERVER
      fetch("upload.php", { method : "POST", body : data })
      .then(res => res.text())
      .then(res => console.log(res))
      .catch(err => coole.error(err));
    },
    "image/webp", 0.7
  );
}
To upload the canvas to the server:
- (D1) Convert the canvas to a
blob. - (D2) Create a
new FormData()object, attach theblobas a file. - (D3) Upload to the server. Yes, this acts just like a “normal AJAX file upload”
- Accept the upload on the server side as usual. Here’s a one-liner example in PHP –
move_uploaded_file($_FILES["file"]["tmp_name"], $_FILES["file"]["name"]);
THE END – RESIZE IMAGE & KEEP ASPECT RATIO
That’s all for this quick tutorial and example. If you need to “resize and maintain the aspect ratio”, it’s a simple 3-line calculation:
let width = 1000;let ratio = width / img.naturalWidth;let height = Math.ceil(ratio * img.naturalHeight);
CHEAT SHEET