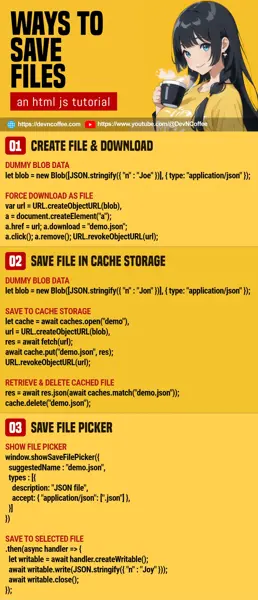
Once upon a time, a student wanted to save a generated report in her web app, but all she found were “confusing indirect ways to save files”. Well, browser-based Javascript is deeply seated in security concerns when saving files… It is not cool when you visit a website and files are suddenly saved without your knowledge.
So while modern Javascript is capable of saving files, the restriction of “the user must manually save it” remains. Let Master Coffee walk you through some simple examples – Let’s go!
CODE DOWNLOAD
I have released this under the MIT license, feel free to use it in your own project – Personal or commercial. Some form of credits will be nice though. 🙂
VIDEO TUTORIAL
METHOD 1) CREATE & FORCE DOWNLOAD FILE
// (PART A) DUMMY DATA TO BLOB
var data = { "name" : "Joe Doe", "email" : "[email protected]" },
blob = new Blob([JSON.stringify(data)], { type: "application/json" });

// (PART B) FORCE DOWNLOAD AS FILE
var url = URL.createObjectURL(blob),
a = document.createElement("a");
a.href = url;
a.download = "demo.json";
a.click(); a.remove();
URL.revokeObjectURL(url);
This is one of the most common and simplest methods. Just turn your data into a blob and force download.
- Define your data, and turn it into a blob. Yes, this works with all kinds of files/data – Text, spreadsheets, images, and even videos.
- Force download the blob as a file.
- Use
URL.createObjectURL(BLOB)to create a URL for the blob. - Create an anchor tag
<a>. - Link the anchor tag to the URL of the blob, and set the download file name –
<a href="BLOB-URL" download="FILENAME.EXT"> - Click on the link to start downloading.
- Lastly, clean up – Remove the anchor tag and URL.
- Use
METHOD 2) SAVE FILE IN CACHE STORAGE
(async () => {
  // (PART A) CREATE/OPEN CACHE
  let cache = await caches.open("demo");

  // (PART B) DUMMY DATA TO BLOB
  let data = { "name" : "Jon Doe", "email" : "[email protected]" },
  blob = new Blob([JSON.stringify(data)], { type: "application/json" });

  // (PART C) SAVE TO CACHE STORAGE
  let url = URL.createObjectURL(blob),
  res = await fetch(url);
  await cache.put("demo.json", res);
  URL.revokeObjectURL(url);

  // (PART D) RETRIEVE & DELETE CACHED FILE
  res = await caches.match("demo.json");
  res = await res.json();
  console.log(res);
  cache.delete("demo.json");
})();
For the beginners, a “cache storage” is essentially a “sandbox folder to store web app assets”. This is a different cache than the “browser default cache”, and we can use it to save files with some creativity.
- Start by creating/opening a cache –
caches.open(NAME). - As usual – Define the data and turn it into a blob.
- Save the blob into the storage cache.
- Create a URL for the blob.
- Fetch the blob URL and put the response into the cache –
cache.put("FILENAME.EXT", FETCH RESPONSE).
- To retrieve the file from the storage cache.
- Use
caches.match("FILENAME.EXT"). - In this example, we will parse the retrieved file as JSON data.
- It can also be returned as
res.arrayBuffer(),res.blob(),res.formData(),res.text().
- Use
P.S. This is a barebones example, I will recommend that you follow up with studying the CacheStorage API.
METHOD 3) SAVE FILE PICKER
<script>
function save () {
  // (PART A) SHOW FILE PICKER
  window.showSaveFilePicker({
    suggestedName : "demo.json",
    types : [{
      description: "JSON file",
      accept: { "application/json": [".json"] },
    }],
  })

  // (PART B) SAVE TO SELECTED FILE
  .then(async handler => {
    // (B1) DUMMY DATA
    let data = { "name" : "Joy Doe", "email" : "[email protected]" };

    // (B2) WRITE TO FILE
    let writable = await handler.createWritable();
    await writable.write(JSON.stringify(data));
    await writable.close();
  })

  // (PART C) OPTIONAL - HANDLE ERRORS
  .catch(err => console.error(err));
}
</script>

<!-- (PART D) "FILE PICKER" -->
<input type="button" value="Pick" onclick="save()">
Finally, open a “save as” dialog in the browser itself.
- Use
window.showSaveFilePicker(OPTIONS)to show the “save as” dialog box – Check out the documentation for the full list of options. - After the user selects where to save the file, create a writable stream and write the data.
- That’s all. It is optional to handle errors.
P.S. Take note that the save file picker is experimental at the time of writing, and only available on some browsers only.
THE END – OTHER WAYS TO SAVE DATA
That’s all for this short tutorial and sharing, I hope one of these methods worked for you. Not to worry if none of those are to your liking, there are many more ways to store data in modern Javascript – Check out my other tutorial on ways to store data in Javascript. Also, to do the opposite – Ways to read files in Javascript.
CHEAT SHEET

