Once upon a time, a student had to create a simple timetable. She loaded an entire framework along with a “timetable plugin”, then complained something about “very slow and complicated”. Well, there’s no need for a framework to create a timetable. Let Master Coffee show you how to create one using only CSS grid – Let’s go!
CODE DOWNLOAD
I have released this under the MIT license, feel free to use it in your own project – Personal or commercial. Some form of credits will be nice though. 🙂
VIDEO TUTORIAL
HTML CSS TIMETABLE DEMO
08:00
12:00
16:00
Mon
Tue
Wed
Thur
Fri
Buy Coffee.
Prepare Coffee.
Brew Coffee.
Drink Coffee.
Smoke Coffee.
PART 1) BASIC TIMETABLE GRID
1A) THE HTML
timetable.html
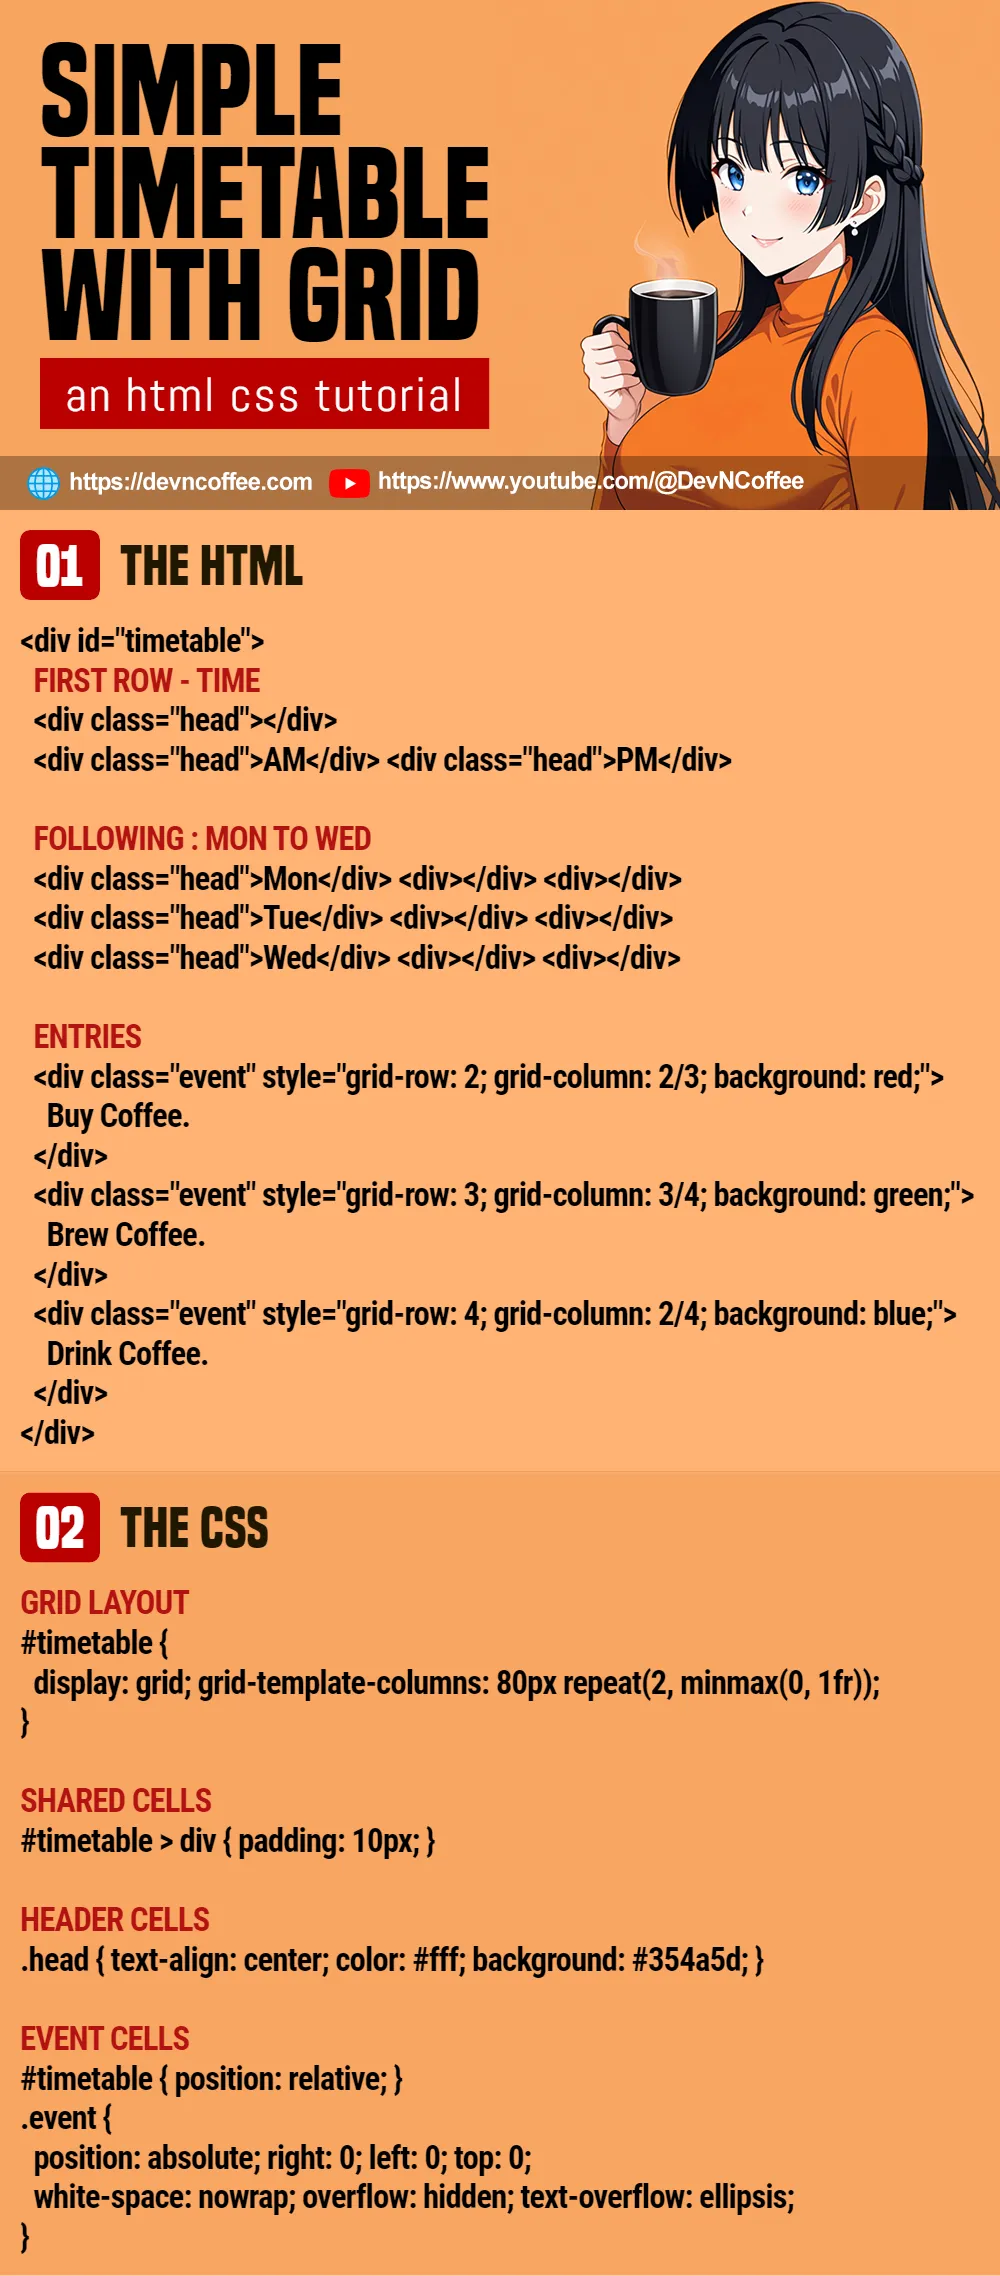
<div id="timetable">
  <!-- (PART A) FIRST ROW : TIME -->
  <div class="head"></div>
  <div class="head">08:00</div>
  <div class="head">12:00</div>
  <div class="head">16:00</div>

  <!-- (PART B) FOLLOWING : MON TO FRI -->
  <div class="head">Mon</div>
  <div></div><div></div><div></div>
  <div class="head">Tue</div>
  <div></div><div></div><div></div>
  <div class="head">Wed</div>
  <div></div><div></div><div></div>
  <div class="head">Thur</div>
  <div></div><div></div><div></div>
  <div class="head">Fri</div>
  <div></div><div></div><div></div>
</div>- Start by creating a
<div id="timetable">container. - (A) Then, insert the cells for the first row. We have 4 columns for this example – Empty, 8AM, 12PM, 4PM.
- (B) Lastly, insert the cells for the following rows. We will go with Monday to Friday for this example.
1B) THE CSS
timetable.css
/* (PART A) GRID LAYOUT */
#timetable {
  display: grid;
  grid-template-columns: 80px repeat(3, minmax(0, 1fr));
}

/* (PART B) SHARED CELLS */
#timetable > div { padding: 10px; }

/* (PART C) HEADER CELLS */
.head {
  text-align: center;
  color: #fff;
  background: #354a5d;
}- (A) To turn
<div id="timetable">into a “table”, set it todisplay: grid. - (A) Use
grid-template-columnsto specify with width of the columns. For those who are lost, the first column will be 80 pixels, followed by 3 equally spaced columns. - (B & C) Cosmetics for the cells and headers – Feel free to change these as you see fit.
PART 2) ADD THE EVENTS
2A) THE HTML
timetable.html
<div id="timetable">
  <!-- (PART C) ENTRIES -->
  <div class="event" style="grid-row: 2; grid-column: 2/3; background: #f9cbe2;">
    Buy Coffee.
  </div>
  <div class="event" style="grid-row: 3; grid-column: 3/4; background: #cbf9d9;">
    Prepare Coffee.
  </div>
  <div class="event" style="grid-row: 4; grid-column: 4/5; background: #cbf3f9;">
    Brew Coffee.
  </div>
  <div class="event" style="grid-row: 5; grid-column: 2/4; background: #f6f9cb;">
    Drink Coffee.
  </div>
  <div class="event" style="grid-row: 6; grid-column: 3/5; background: #ffd5ae;">
    Smoke Coffee.
  </div>
</div>
In part 1, we have created an empty timetable. All that’s left is to insert the events.
- As you can see, each event is simply a
<div class="event">TEXT</div>. - There are 3 things we have to specify for each event.
grid-rowWhich row/day. For this example, row 2 is Monday, row 3 is Tuesday, etc…grid-column: START/ENDWhich columns/time. For this example – 2/3 will span across 8AM, 3/4 across 12PM, 4/5 across 4PM, 2/4 from 8AM to 12PM, etc…backgroundWell, self-explanatory. The background color of the event.
2B) THE CSS
timetable.css
/* (PART D) EVENT CELLS */
#timetable { position: relative; }
.event {
  position: absolute; right: 0; left: 0; top: 0;
  white-space: nowrap; overflow: hidden; text-overflow: ellipsis;
}- To place the events properly – Set the container to
position: relative, and the events toposition: absolute; right: 0; left: 0; top: 0. - One small problem here. If the event text wraps into a new row, it will confuse the users. For example, if “prepare coffee” breaks into 2 lines, people will see it as “Tuesday and Wednesday 12PM”.
- So prevent the text from wrapping with
white-space: nowrapandoverflow: hidden. - Optionally,
text-overflow: ellipsiswill show...when the text is cutoff.
THE END – EVENT TEXT RESTRICTIONS
That’s all for this short tutorial and example, one last bit here to follow up on the event text. If you want to show the event text in full, here are 2 possibilities:
- Change the CSS to
white-space: nowrap; overflow: auto;instead. This will create an ugly scrollbar, but at least people can see the text in full. - Alternatively, add
title="EVENT TEXT"to the<div>. This will show the text in full on mouse hover after a few seconds.
CHEAT SHEET